Valorant Error Code VAN 81: How to Quickly Fix it
Are you troubled by the VAN 81 error code in Valorant? Heads up, we have a solutions for that 😎
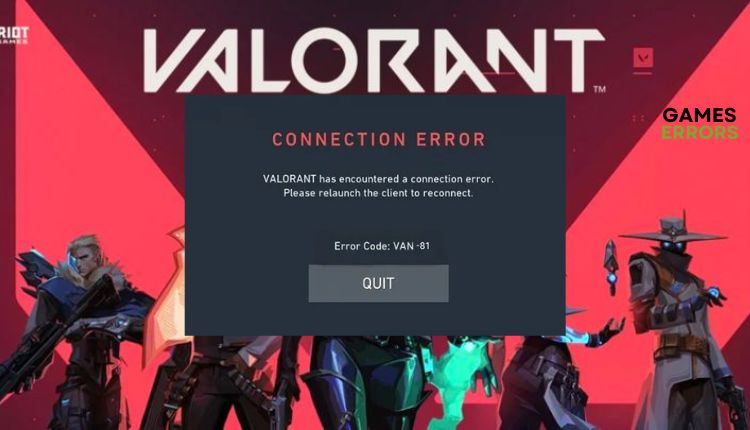
Valorant is a multiplayer hero-shooter signed by Riot games ( LoL). The game uses the controversial Vanguard anti-cheat software, which boots up with Windows, goes very deep into the core of the operating system, and can block some drivers automatically it finds suspicious. Unfortunately, the game will not work without Vanguard and its service VGC. If VGC is disabled or blocked by a firewall or antivirus, the error VAN 81 will occur: “VALORANT has encountered a connection error. Please relaunch the client to reconnect”. This article will give tips for avoiding the VAN 81 error and playing Valorant normally.
What is the van 81 error?
The most common reason for Error Code VAN 81 in Valorant is Riot Vanguard’s anti-cheat system and VGC service. Unfortunately, Vanguard tends to generate a lot of error codes, including this one.
How do I fix error code 81 on Val?
Before our recommendations, do these simple steps:
- Open Task Manager (Ctrl+Shift+Enter), and click End Task on each Riot and Valorant-related task. After that, launch Valorant to see if the issue is resolved.
- Run Valorant as an administrator.
- Restart your PC.
- The error may occur if you also have an unstable internet connection. Reset your router or modem.
Let’s presume you still have VAN 81 Valorant error. Follow our tips:
- Allow Valorant and Riot Vanguard through the firewall
- Temporarily disable third-party antivirus
- Check VGC service status
- Enable VGC service to start with Windows
- Reinstall Riot Vanguard or Valorant
1. Allow Valorant and Vanguard through the firewall
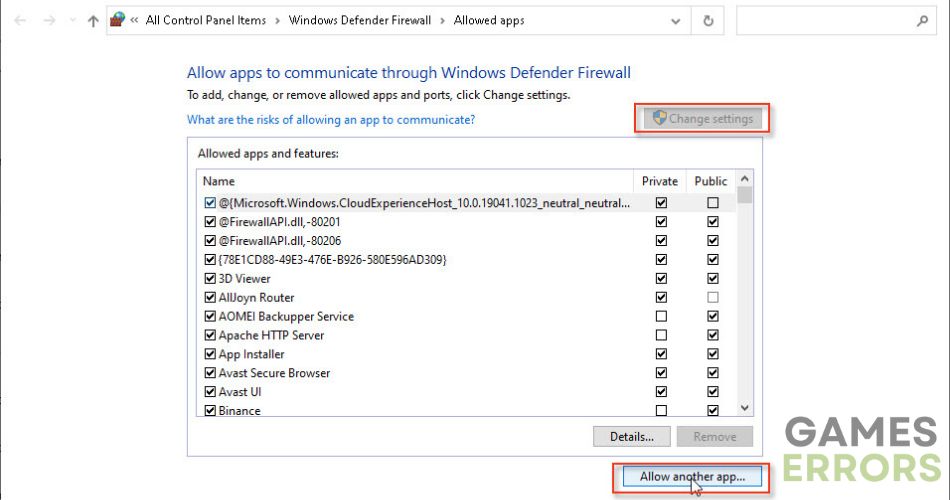
Your firewall may block Valorant and Vanguard files and VGC services, leading to a VAN 81 error message. First, we recommend allowing the programs mentioned in the Windows firewall. Do the following:
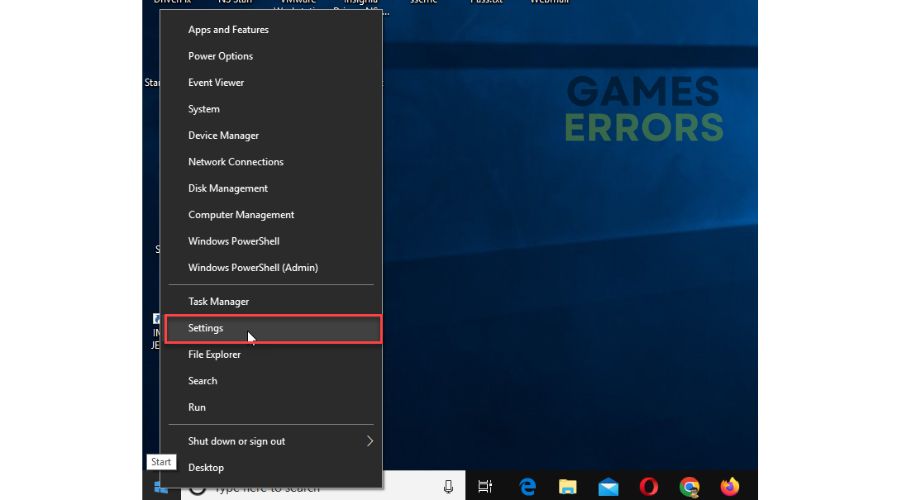
1. Right-Click on Windows Start, click the Settings option, then choose Update & Security.
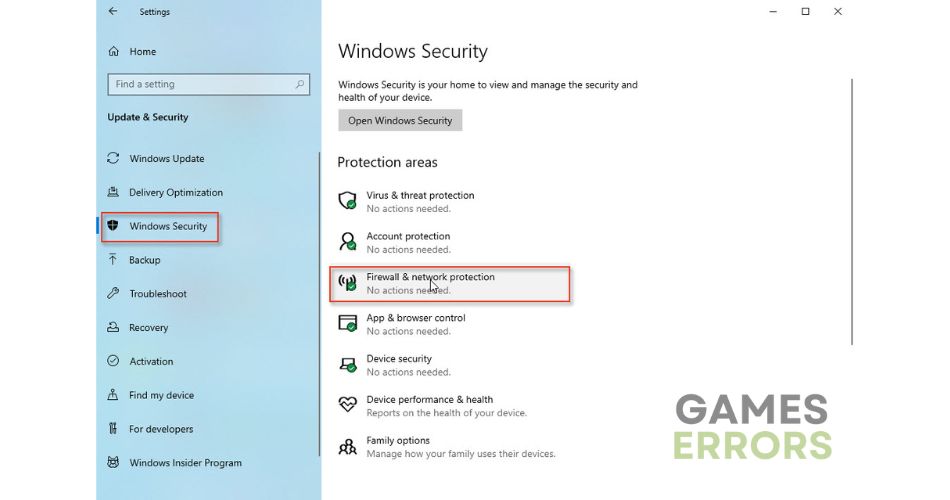
2. Select Windows Security from the left side and click Firewall and Network Protection.
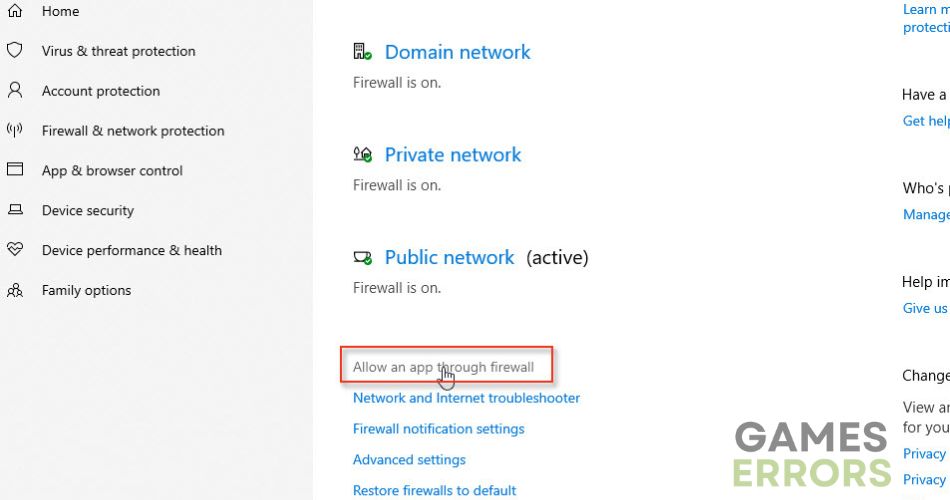
3. Click on the option Allow an app through firewall.
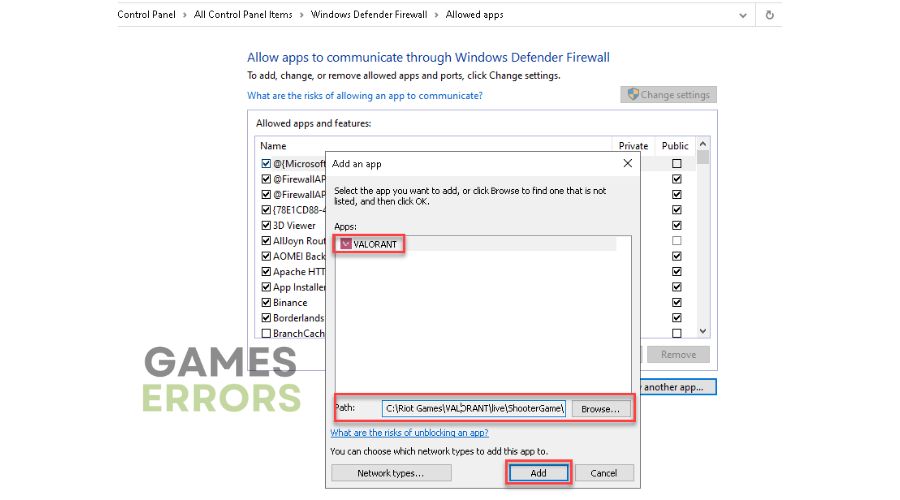
4. Click on the Change Settings button and then on Allow Another App.
5. Use the Browse option to add the Valorant exception to the firewall. By default, Valorant is in C:\Riot Games\VALORANT\live\ShooterGame\Binaries\Win64.
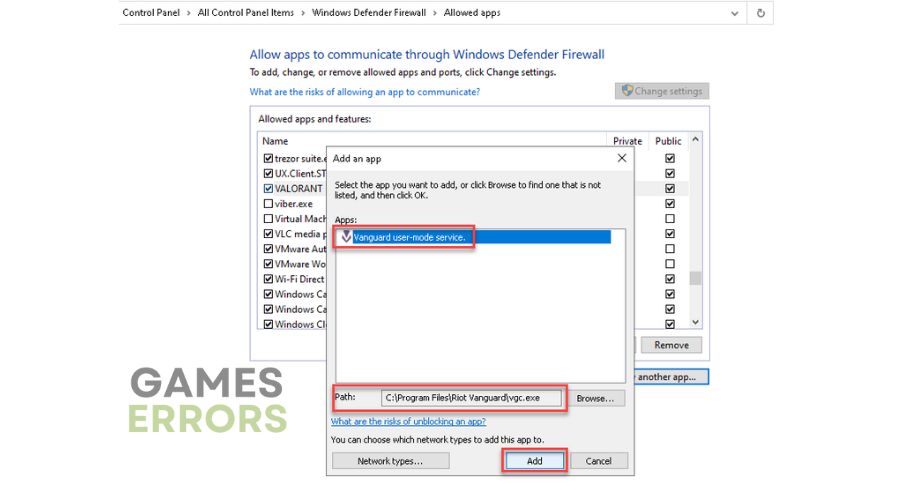
6. Repeat the previous step to add the VGC exception to the firewall. By default, Riot Vanguard is in C:\Program Files\Riot Vanguard.
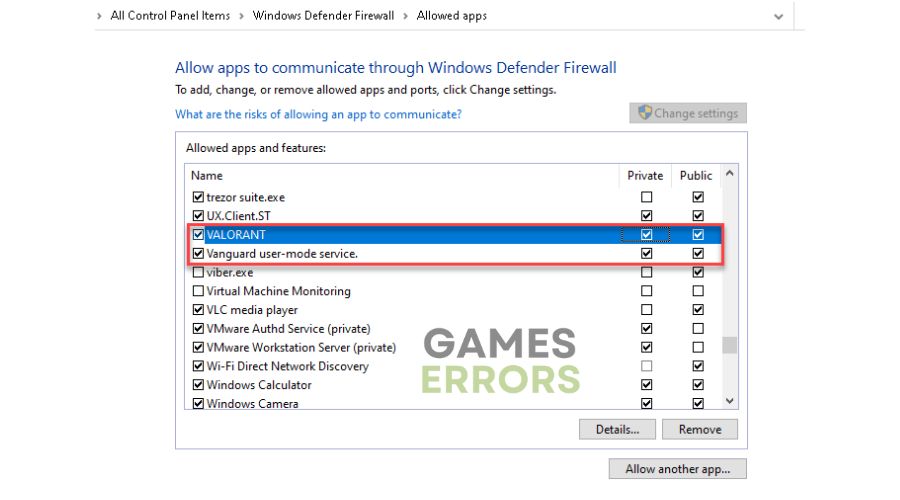
7. Tick the respective checkboxes by allowing Valorant and VGC through Public and Private networks, and confirm on OK.
2. Temporarily disable third-party antivirus
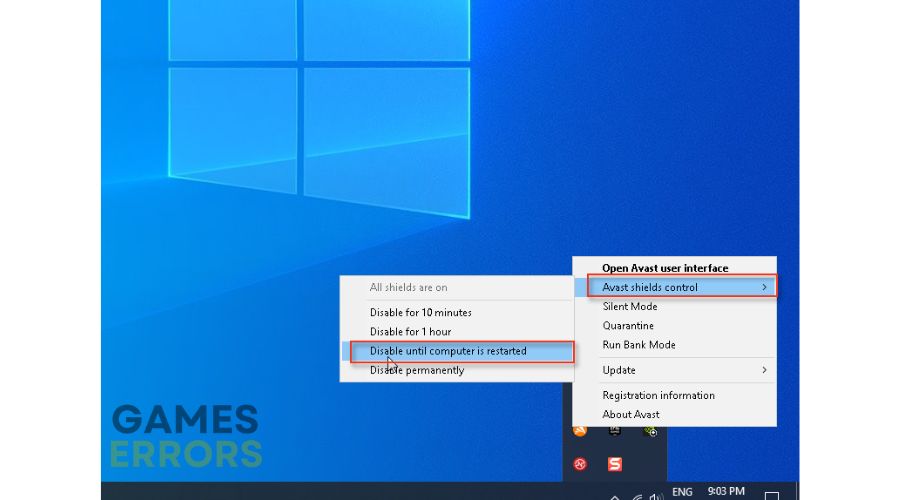
Often, third-party antiviruses can cause connection or game launch problems. The antivirus mistakenly detects some processes as malicious, and the only remedy against this behavior is that you temporarily disable it or add the game to the safelist. Contact their support if you are unsure how to add an exception for Valorant or Vanguard in your antivirus program. Here’s how to temporarily disable third-party antivirus:
1. Right – Click on the antivirus icon in the system tray and choose shield control.
2. Select Disable until the computer is restarted, and try to launch Valorant to see if the VAN 81 error is gone.
3. Check VGC service status
Time needed: 1 minute
The VGC service is the basis of Riot Vanguard, which should work properly in the background; otherwise, you cannot play VALORANT.
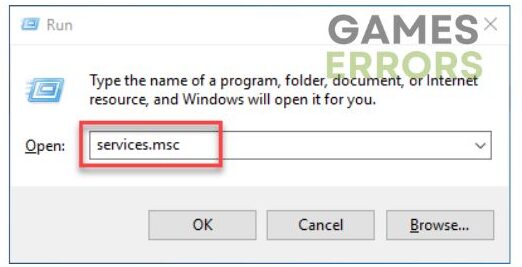
- Press the Windows +R keys on the keyboard
In the Run dialog box, type; services.msc and press Enter.
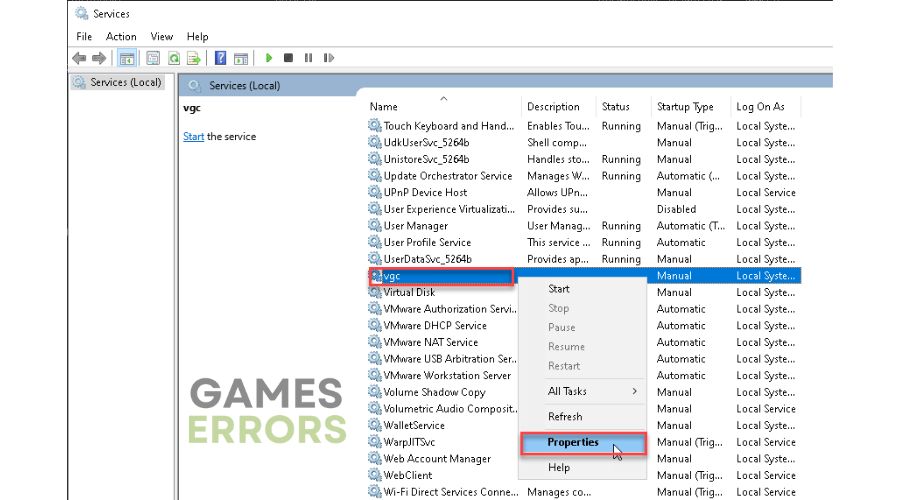
- Find the VGC service
In the Services window, right-click on VGC service, and select Properties.
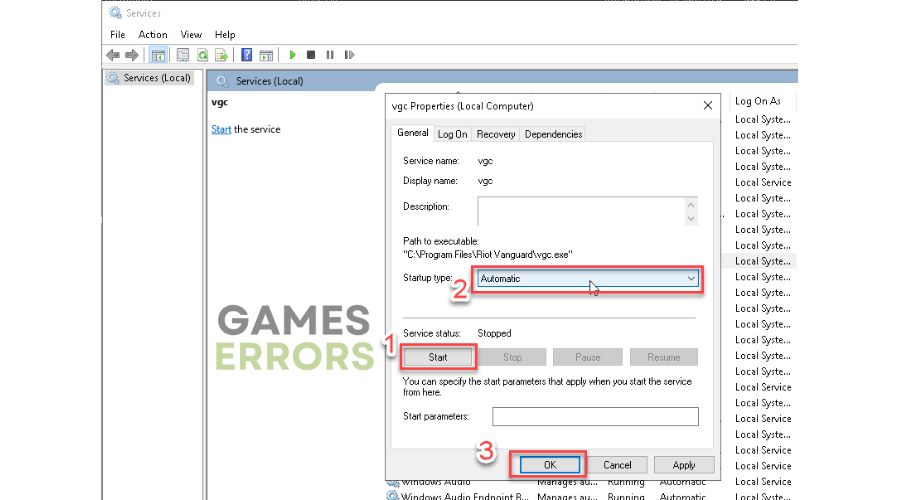
- Start VGC service
If the VGC service isn’t running, click on Start. Then, change the startup type to Automatic, and finally, confirm all changes on OK.
4. Enable VGC service to start with Windows
If you have accidentally or intentionally disabled the VGC service from starting with the OS, this will undoubtedly lead to the VAN 81 error code in Valorant. To make sure VGC will boot with Windows, do the following:
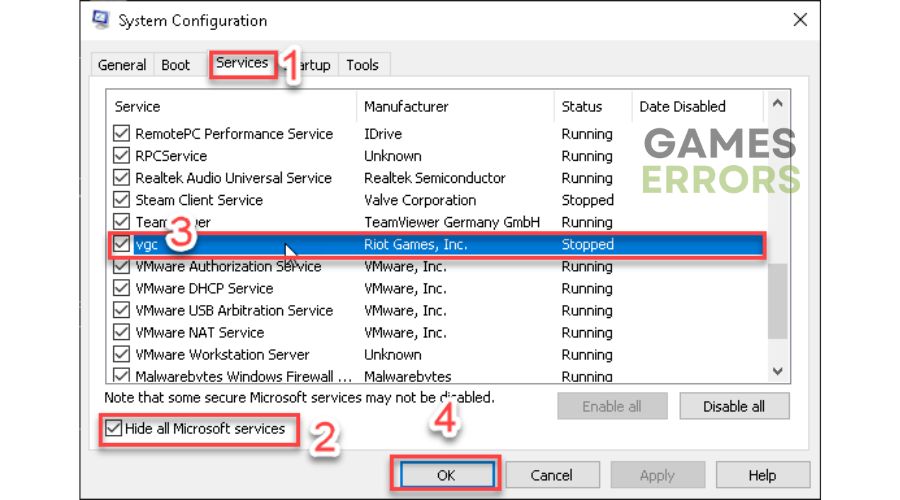
1. In the Windows search box, type: msconfig.
2. Select the Services tab. First, tick the checkbox Hide all Microsoft services, then vgc service.
3. Click on Apply, then OK; next time, VGC service will automatically start with Windows.
5. Reinstall Riot Vanguard or Valorant
If the previous steps did not help you solve the VAN 81 error code in Valorant, we recommend you uninstall Riot Vanguard first. This way, you will repair any potentially damaged or missing files that prevent Vanguard from working normally.
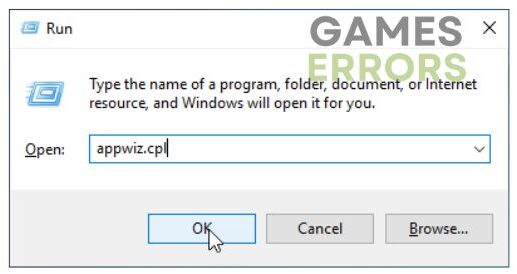
1. Press Windows + R to open the Run dialog.
2. Type; appwiz.cpl and press Enter.
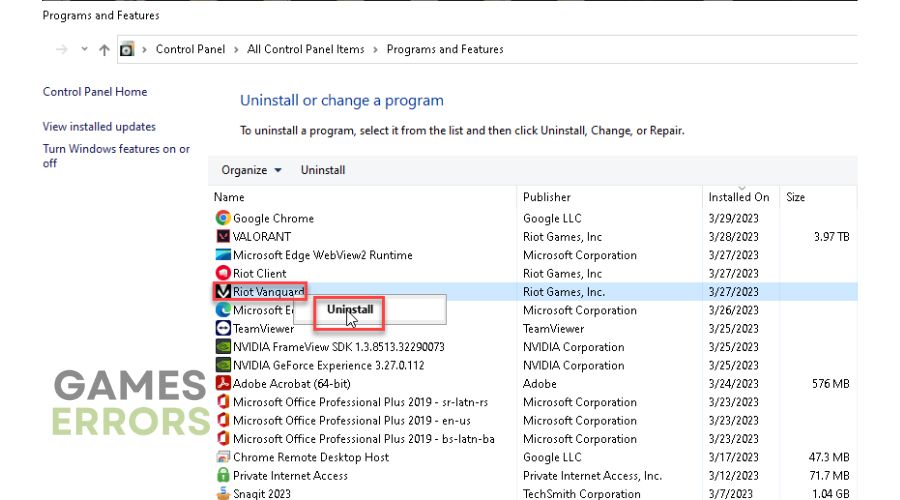
3. Find Riot Vanguard, right-click on it, and select Uninstall.
4. When Riot Vanguard is uninstalled, launch Valorant to install Riot Vanguard automatically.
5. After that, check if the VAN 81 error has disappeared. If not, uninstall Valorant in the same way as Riot Vanguard.
6. Reinstall Valorant and check if VAL 81 error is gone.
Related articles:
- Valorant Error Code VAL 5: Explained And How To Fix
- Val 19: Quick Fixes For This Error Code
- SOLVED: DX11 Feature Level 10.0 Is Required To Run The Engine
Conclusion
Here are the best solutions to eliminate the VAN 81 error code in Valorant. However, if you still have a problem or some other way to solve it, comment below.




User forum
0 messages