
Halo Infinite Directx 12 Error: How to Fix It Instantly
DirectX 12 Error occurs when the system does not meet the requirements of the game🚩
Have you tried launching Halo Infinite and received an error message: ‘ Could not find compatible Graphics Device due to the following missing feature: Hardware Tiled Resources Tier 2’?
Compatibility issues, outdated or missing DirectX components or problems with the game’s installation or configuration tend to be common culprits. To help you resolve these issues, we have outlined a detailed guide on how to fix the DirectX 12 error in Halo Infinite and get back to playing your favourite game.
Why Do I Keep Getting Directx12 Error in Halo?
- Incompatible Graphics Card: As mentioned above, If your graphics card does not satisfy the minimal requirements for the game, you will more than likely receive the error.
- Outdated Drivers: Updating your graphics card drivers is necessary to ensure compatibility with the most recent games. The DirectX 12 error might be fixed by updating your drivers if you have outdated ones.
- Missing DirectX Components: DirectX is made up of several components, and if any of these components are missing or damaged, you may encounter an error.
- Game Installation Issues: If the game was not installed correctly, you may experience errors such as the DirectX 12 error.
- System Conflicts: Conflicts with other software or hardware on your system could cause the DirectX 12 error in Halo Infinite.
How do I fix the DirectX 12 error on Halo?
Table of contents:
- Install the Latest DirectX12 Version
- Update Graphics Driver to the Latest Version
- Install DirectX runtime
- Try Reinstalling Microsoft Visual Studio C++
- Edit your File Name
- Reinstall Halo Infinite
Before trying the main methods listed above, ensure:
- Your PC meets the minimum Halo Infinite requirements
- Your game is downloaded from the official source
If you are still certain to have followed the right steps and the issue is not resolved, try following the steps outlined below to fix DirectX 12 error:
1. Install the Latest DirectX12 Version
- Go to the Microsoft website and download the latest DirectX version. The download link can be found on the DirectX download page.
- Run the DirectX setup file and follow the on-screen instructions to install the latest version of DirectX 12.
- After installation, restart your computer to ensure the changes have taken place.
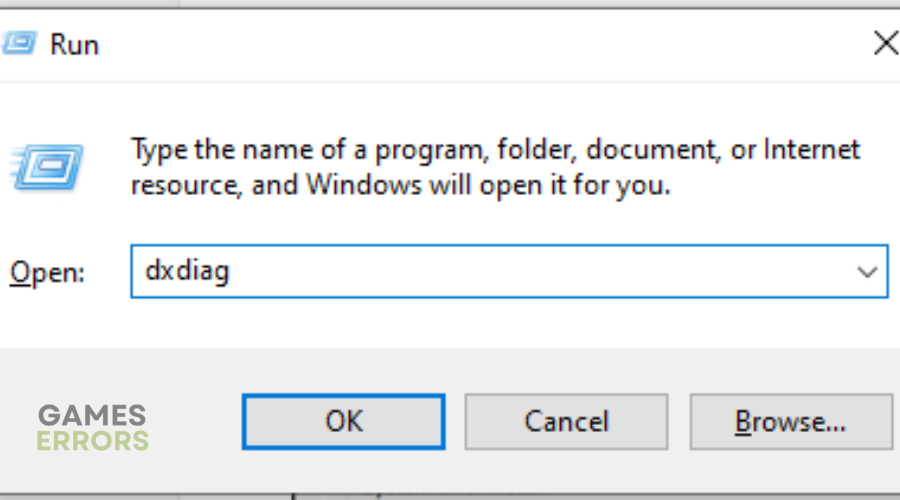
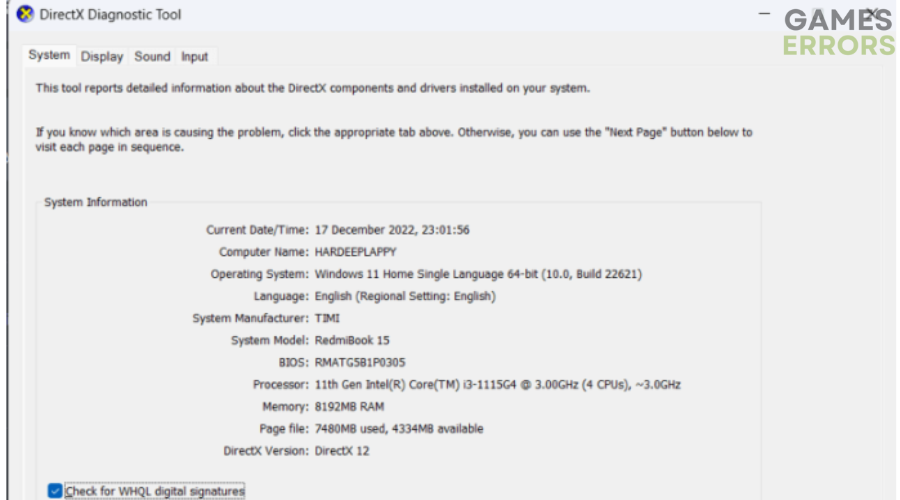
- Use the DirectX Diagnostic Tool to verify that DirectX 12 has been installed correctly. To achieve this, press the Windows key + R, type “dxdiag” in the Run dialog box, and press Enter.

- If you already have the latest version installed, the page below will be displayed:
2. Update Graphics Driver to the Latest Version
You can easily fix all PC and game compatibility problems when you update your graphics drivers. This makes it possible for your device to interact easily with certain game files and functionalities.
You can either manually update your drivers by looking for them on your device or you can try automatic updates by downloading them from the relevant websites.
➡️ Manually update your drivers by following the steps below:
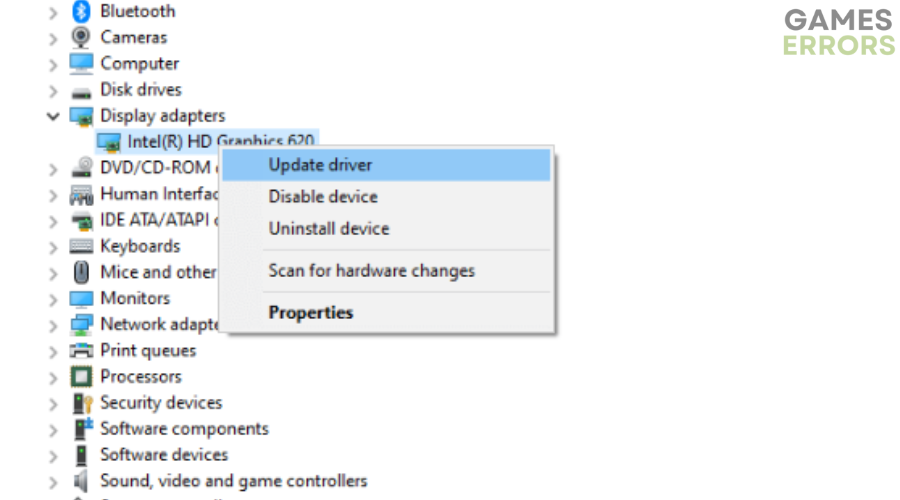
- Press the Windows key and type “Device Manager” in the search bar.
- Select “Device Manager” from the search results to launch it.
- Expand the “Display adapters” category by double-clicking on it.
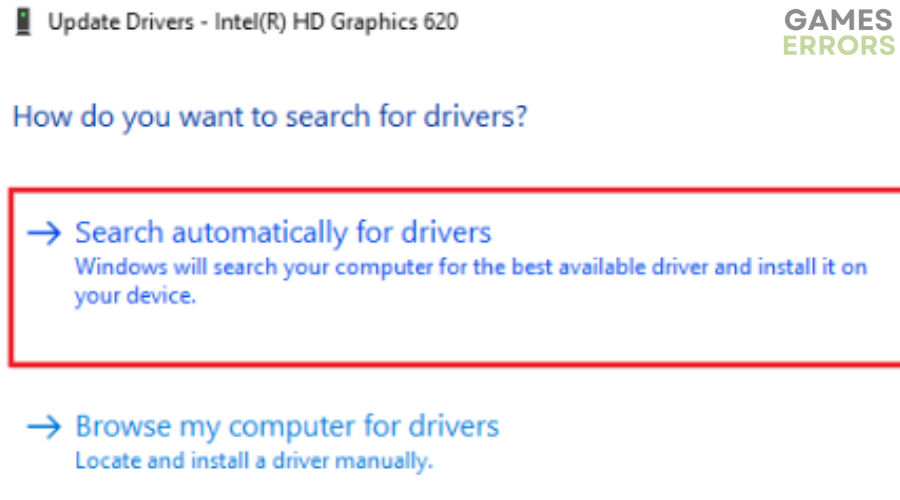
- Right-click on “Intel(R) HD Graphics 620” (or any other outdated driver) and select “Update driver.”

- Repeat these steps for any other outdated drivers.
- Select the “Search automatically for updated driver software” option. This will cause your system to search for and install the best available driver on your computer.

- Close all windows related to the Device Manager and restart your computer.
- After rebooting, relaunch Halo Infinite.
It is worth noting that PC HelpSoft is a credible third-party tool that offers a better alternative to the Device Manager. One of the significant advantages of using this tool is that it can save you valuable time by handling all your PC drivers’ download, installation, and update processes. This simplifies the process of maintaining your computer’s drivers resulting in top performance.
Additionally, you can try automatic updates by downloading them from relevant websites. This can be achieved by:
- Determining the manufacturer of your graphics card. This information can be found in the DirectX Diagnostic Tool as instructed above.
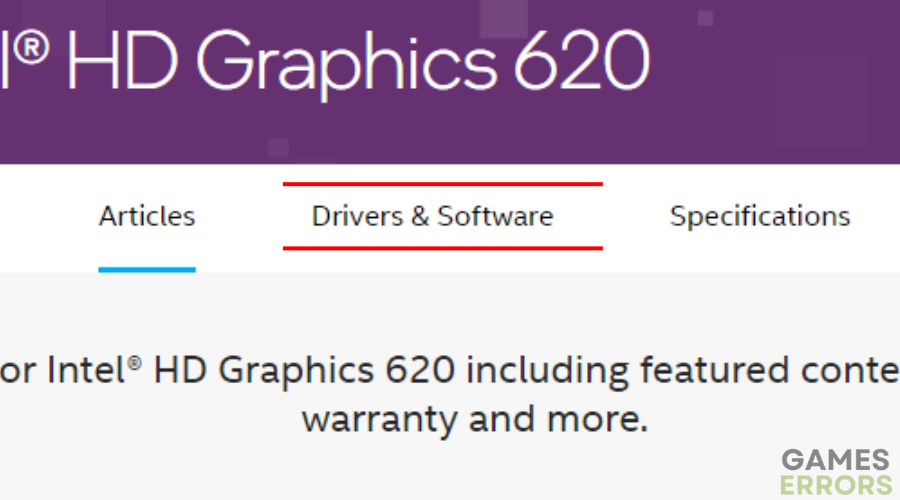
- Assuming you’re using the Intel(R) HD Graphics 620, visit the graphics card manufacturer’s website and go to the “Drivers” or “Support” section.

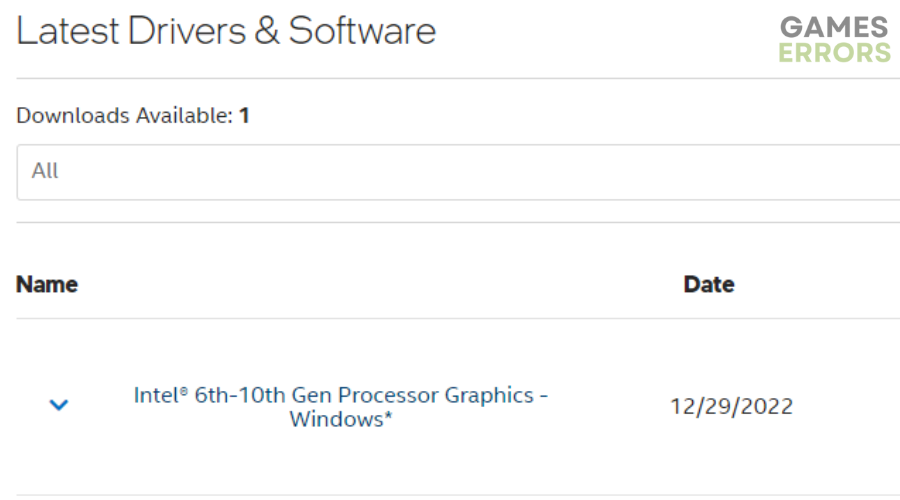
- Find the latest driver for your graphics card and download it to your computer.

- Once the download is complete, run the driver setup file and follow the on-screen instructions to install the latest driver.
- Restart your pc.
3. Install DirectX Runtime
- Go to the DirectX Runtime download page.
- Download the installer.

- Install it and restart your PC.

4. Try Reinstalling Microsoft Visual Studio C++
If none of the previous solutions worked for you and you’re still experiencing the DirectX 12 error in Halo Infinite, try reinstalling the Visual C++ packages.
This will refresh the necessary runtime library packages that are required for the game to run correctly and should fix the error.
You can reinstall Microsoft Visual Studio C++ by:
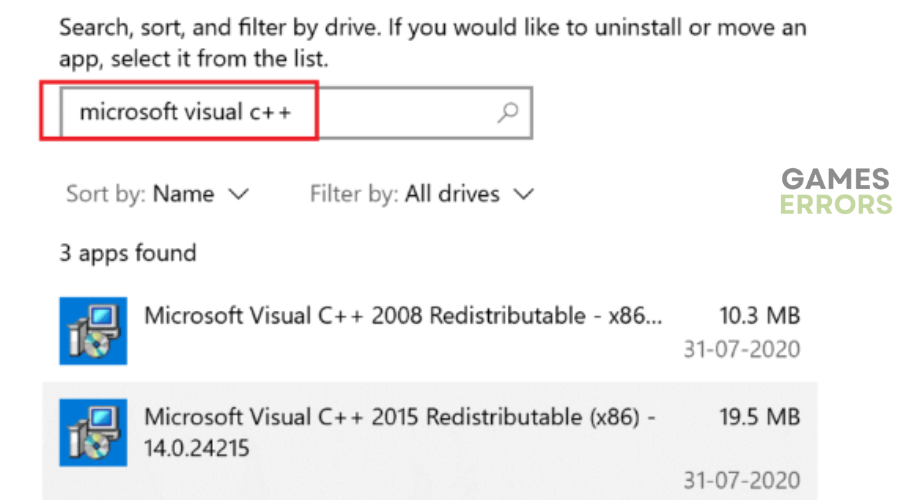
- Go to the Windows search bar, type and select “Apps & features” from the search results.

- Find “Microsoft Visual C++” in the Apps & features window and click on it. Uninstall each package.

- Open the Command Prompt as an administrator. Type “Dism.exe /online /Cleanup-Image /StartComponentCleanup” and press Enter. Wait for the DISM scan to complete.

- Restart your Windows PC.
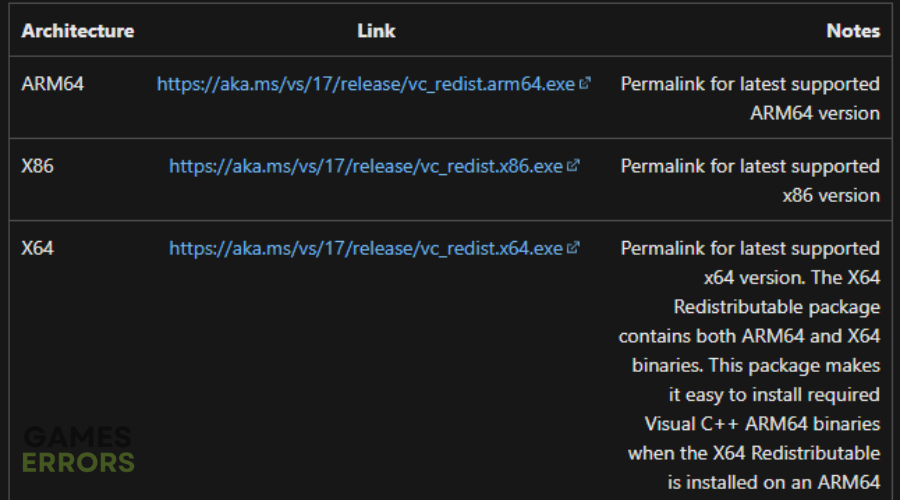
- Visit the Microsoft website and download the latest Visual C++ Redistributable files for Visual Studio 2015, 2017, 2019, and 2022.

- Install each package from the downloads folder by following the on-screen instructions.
- Restart your PC again.


5. Edit your File Name
As reported by many players, editing your file name has fixed the DirectX 12 error. You can achieve this by:
- Open File Explorer by pressing the Windows + E keys.
- Go to the Steam library where you have installed Halo Infinite. The location may vary, but it may look something like “C:\Program Files (x86)\SteamLibrary\steamapps\common\MGS Test App 6\data\hardware“.
- Locate the text file that applies to your situation and rename it. Make sure to make a copy of the file before making any changes.
- Relaunch Halo Infinite after renaming the file.
NB: It may take a few minutes to start the game, be patient and wait until the black screen disappears and you can launch the game successfully.
6. Reinstall Halo Infinite
If none of the solutions works, you can try reinstalling the game as instructed below.
- Open Steam by typing “Steam” in the Windows search bar and clicking on it.
- In the top menu bar, go to Library.
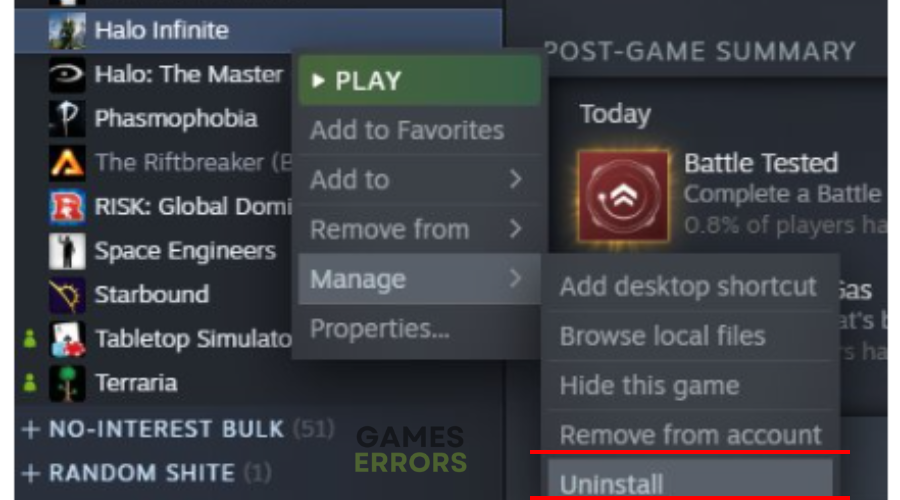
- Right-click on Halo Infinite and select Manage.

- Choose Uninstall to remove the game from Steam.

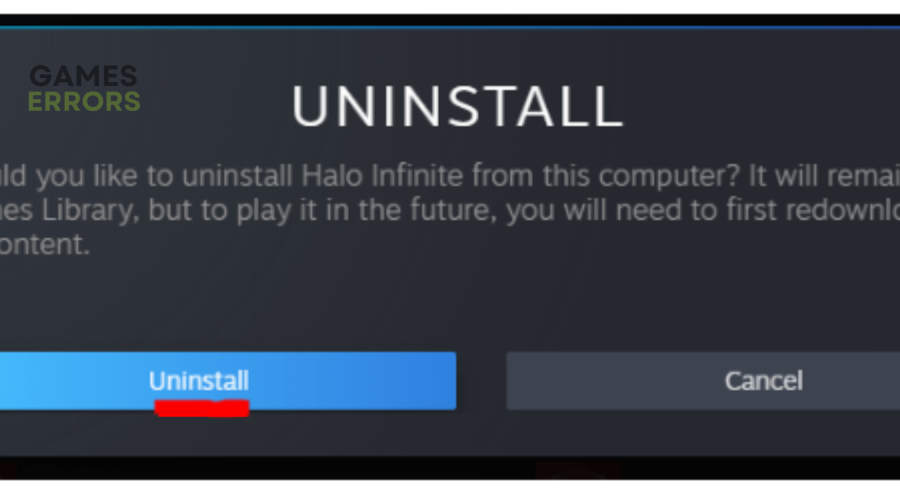
- Confirm the uninstallation by clicking the Uninstall button again.
- Restart your PC and launch Steam again.
- Right-click on Halo Infinite and select Install to reinstall the game.
We hope you managed to fix Halo Infinite Directx 12 error using our guide. Please let us know which solution worked best for you.

Improve this guide
User forum
0 messages