
Minecraft Error 403: How to Fix It Using Quick Solutions
Check our helpful guide if you're struggling with Minecraft Error 403. ✅
Although a popular and well-ironed game, Minecraft is unfortunately not immune to errors. Are you one of the unlucky players who got the 403 error code that can appear when accessing Minecraft Realms? The full message is Error 403: “Minecraft has encountered a problem and needs to close while playing Minecraft. We apologize for the inconvenience.” We tackled this problem and created this guide to help you fix Minecraft error code 403 as soon as possible.
What is error 403 in Minecraft?
If you’re looking to play Minecraft with friends and other players, Minecraft Realms is a subscription-based service that allows you to do just that. Unfortunately, sometimes a 403 error can occur, interrupting your connection to the server on the Realms service. Several potential reasons for this error include internet connection problems, server downtime or overload, game client issues, subscription expiry, etc.
How do I fix error 403 in Minecraft?
It is highly recommended that you follow these basic steps before trying anything complicated:
- Check if Minecraft Realms is down. If the service is experiencing any issues, wait until it is up.
- Power cycle your network devices (modem and router).
- Test and verify your internet connection.
- Restart the game or your PC.
If you have already attempted all the previous steps and are still facing the same issue, follow the next tips:
- Check your subscription status
- Clear Minecraft cache
- Check privacy settings
- Check free disk space
- Reinstall Minecraft
1. Check your subscription status
If you’re experiencing Minecraft Realms Error 403, it’s likely due to an expired subscription. You won’t be able to access your Realms until you renew your subscription. If you want to know the status of your Realms subscription, follow these steps:
1. Launch Minecraft and click on Settings.
2. Select Subscription and check the status on the right pane.
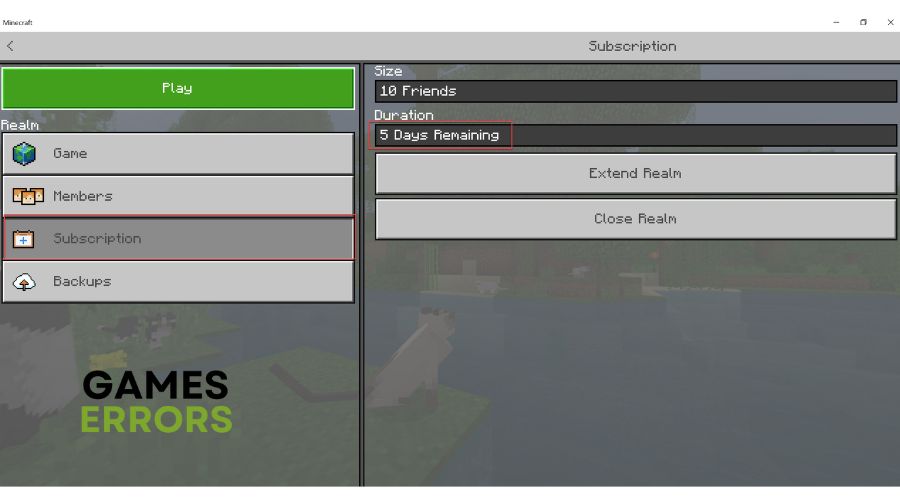
3. To regain access to Minecraft Realms after your subscription has expired, it’s necessary to renew it.
2. Clear Minecraft cache
Time needed: 5 minutes
If you are experiencing Minecraft Error 403, clearing the game cache might help resolve them. The cache temporarily stores data that can sometimes become corrupted, resulting in errors.
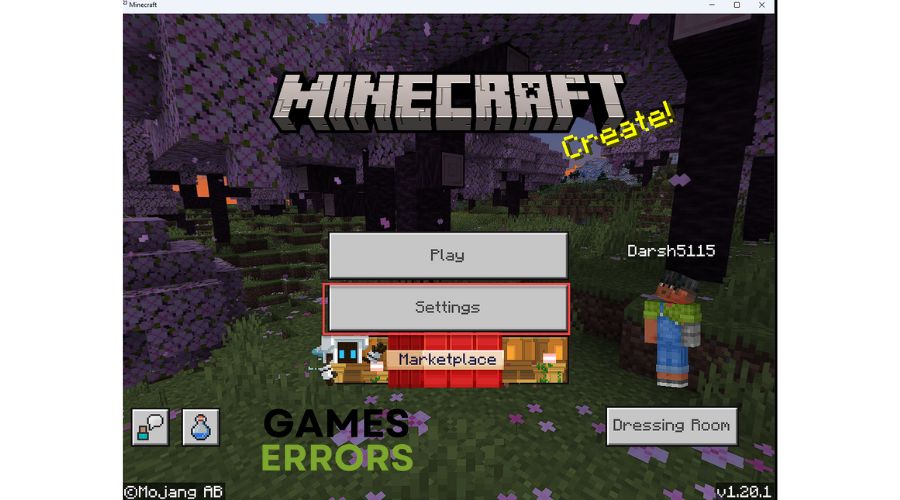
- Launch Minecraft
Click on Settings.

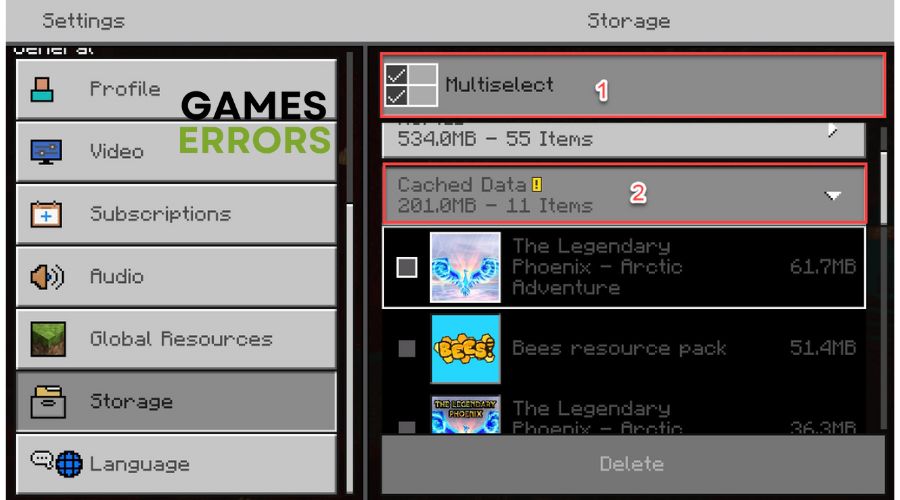
- Choose Storage
Click on Multiselect and expand the Cached Data section.
- Delete cached data
Check all items under Cached data and select Delete.
3. Check privacy settings
To play multiplayer Minecraft, your account must have certain privacy settings enabled. Do the following:
1. Go to Xbox account settings and log in with your account.
2. Select Privacy Settings.
3. Set Allow for You can communicate outside of Xbox Live with voice & text.
4. For Minecraft Bedrock, set Friends for: Others can communicate with voice, text, or invites, and Others can see if you’re online.
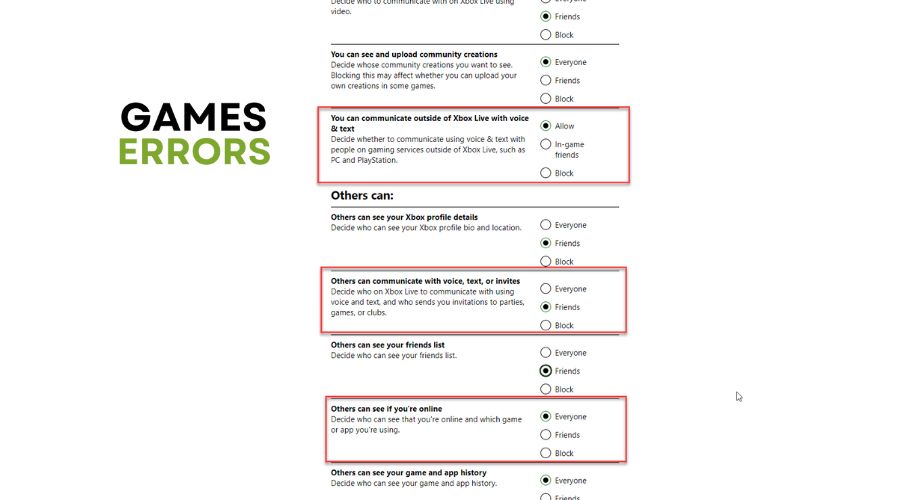
5. Select Xbox One/Windows 10 Online Safety.
6. Set Allow for You can join multiplayer games.
7. For Minecraft Bedrock, set Allow for the following options: You can add friends, and You can create and join clubs.

4. Check free disk space
Low free space on your computer can cause runtime errors like Error 403 while playing Minecraft. This can affect the game’s performance and lead to errors. To avoid this, freeing up space on your hard drive is advisable. Before this, backup your important data to another location or disk.
1. Press Win+E to open File Explorer.
2. Right-click on your primary disk and click Properties.
3. Select Disk Cleanup.
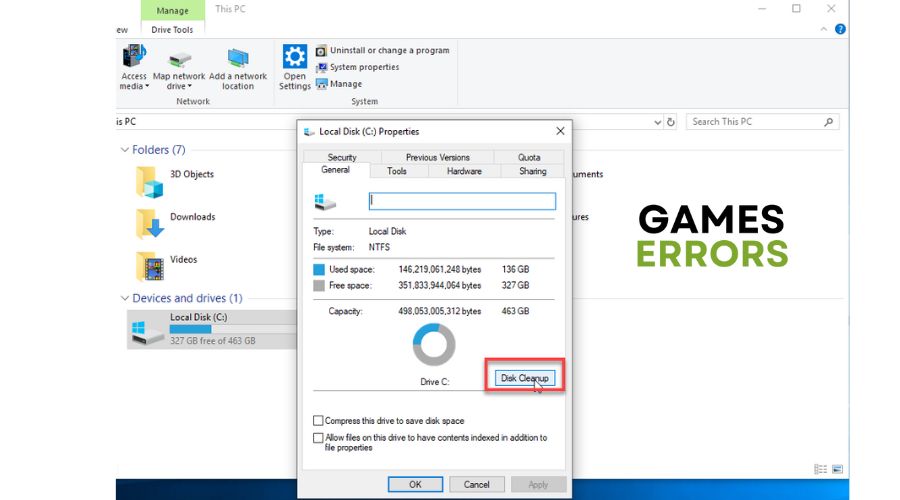
4. Follow the on-screen guide to complete the process.
5. Reinstall Minecraft
If you have tried all our suggested solutions and none have resolved the issue, your Minecraft installation may have become corrupt. The most effective solution would be to uninstall and reinstall Minecraft, ensuring that all the necessary files are updated and in proper working order. Do following:
1. Right-click on Windows Start and choose Apps and Features.
2. Search for Minecraft Launcher, then select Uninstall. Wait for the process to complete.
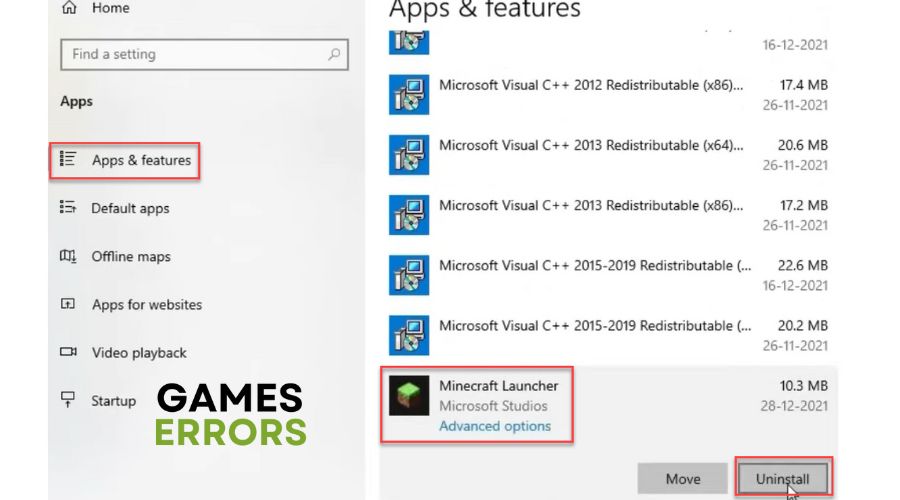
3. Now, search for Minecraft and repeat the process like for the launcher.
4. Also, manually delete the .minecraft folder, and reboot your PC.
5. Finally, download and install a new version of Minecraft.
Conclusion
Check a few things to prevent Error 403 from occurring in Minecraft Realms. Firstly, ensure the Minecraft service status is working, and your network connection is stable. Secondly, check your subscription status and privacy settings, and clear the game cache. It’s also essential to ensure enough free space on your disk. But, if the previous troubleshooting steps do not resolve the error, contacting Minecraft Support is recommended for further assistance. However, if you have further questions or suggestions, comment below; we will gladly assist you.

Improve this guide
User forum
0 messages