
Madden 23 Won’t Update: Why and How To Fix It
Fix the Madden 23 Won't Update problem on PC, check out the solutions discussed in this article. Good Luck😉

Madden NFL 23 is an American football video game by Electronic Arts. Many players of the game on PC have reported that they have difficulty updating the updates for Madden 23. Reports confirm that usually, when they try to update the game, players are confronted by an error, and the installation process stops.
If you are also in the category of players experiencing the Madden 23 won’t update problems, fret not. In this article, we have provided you with proven solutions you should implement to get rid of any installation errors while updating Madden 23.
Why is Madden 23 not updating?
There are several factors that could disrupt the updating process while updating your Madden 23 game on PC. However, a strong and stable internet connection is an important part of the process.
The corrupted game cache may also contribute to the installation problem while updating Madden 23. Other factors include firewall restrictions and your PC’s storage capacity.
How do I update Madden 23?
To resolve the Madden 23 won’t update problem and enjoy the exciting experience the game offers, try out the troubleshooting tips below:
- Restart your game severally, and unplug all peripherals connected to your PC.
- Run your game client as an administrator.
If the problem persists, implement the fixes highlighted and discussed as follows:
- Clear Game Data
- Clear Download Cache
- Remove Firewall Restrictions
- Update Graphics Drivers
- Perform Clean Boot
1. Clear Game Data
The first solution you should consider implementing is to clear the game data in your game client, then try to reinstall the update. This has been proven to be effective in preventing download or installation issues while updating Madden 23. If you are using Steam, follow the steps below:
- Open Steam and click on the Steam Menu, then select Settings.
- Click on Cloud from the left pane, then uncheck the “Enable Steam Cloud synchronization for application which supports it” option.
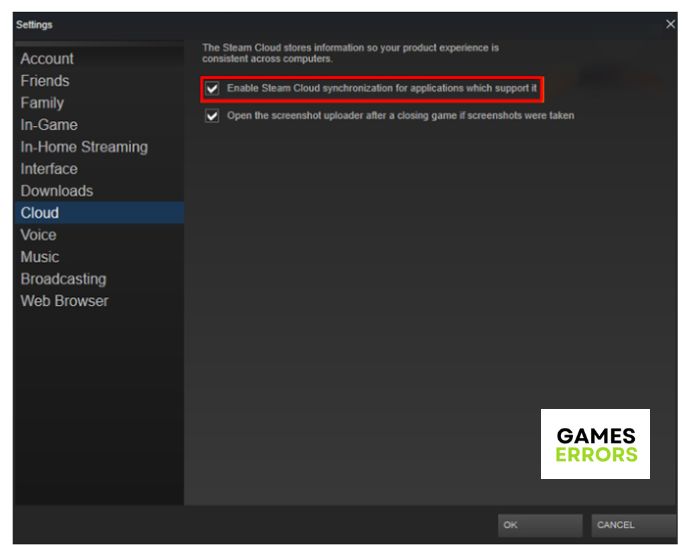
- Click OK to save the change.
- Right-click on Madden NFL 23, then select Properties.
- Click on Local Files and click on the Browse button.
- Open the folder named “Saves” or “Save.ini” as the case may be.
- Delete all the files in the folder. Close the folder afterward and try to update Madden 23 again.
2. Clear Download Cache
If the problem persists, you should go ahead with clearing the download cache in your game client. Note that you will lose the saved data for other games you have installed on your PC via the game client. Follow the steps below to do this on Steam:
- Navigate to the Steam menu on the top-right corner of the page, then click Settings.
- Click on the Downloads option.
- Click CLEAR DOWNLOAD CACHE and click OK.
- Log in to your Steam account, then install the update for Madden 23.
If you are using the EA app, follow the steps below:
- Open the EA app and select the three dashes in the far-left corner.
- Select Help, and Click on App recovery.
- Select Clear cache.
- Log in to your account and install the update for Madden 23.
3. Remove Firewall Restrictions
Firewall restrictions protect your PC from any attack from surfing the internet and even downloading files or data. However, you should also try to remove the restrictions to allow seamless download/installation of Madden 23 update. Follow the steps outlined below:
- Open Control Panel and Navigate to System and Security < Windows Defender.
- Select Turn Windows Defender Firewall on or off from the left panel.
- Select Turn off Windows Defender Firewall (not recommended) for both private and public network settings.
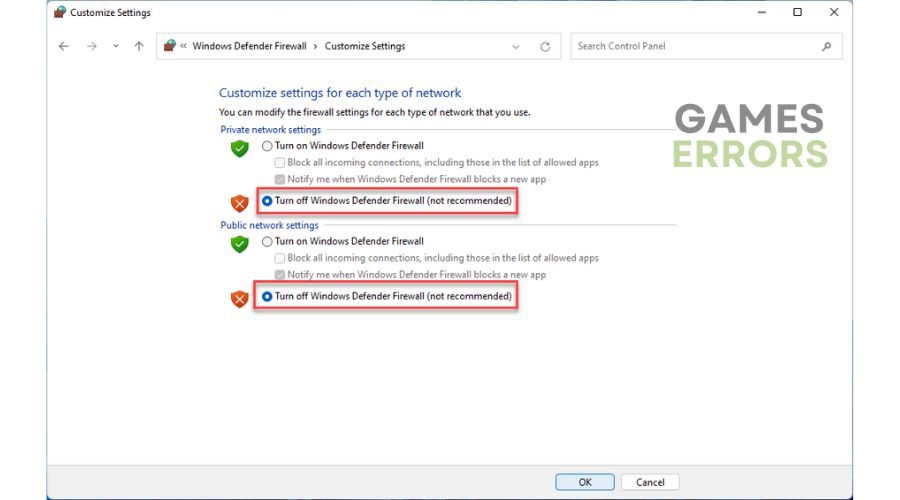
- Click OK and try to install the update again.
4. Update Graphics Drivers
Time needed: 4 minutes
Always ensure that your network driver is updated to help you prevent/fix common game issues relating to performance and/or installing game updates. Follow the steps below to update network driver:
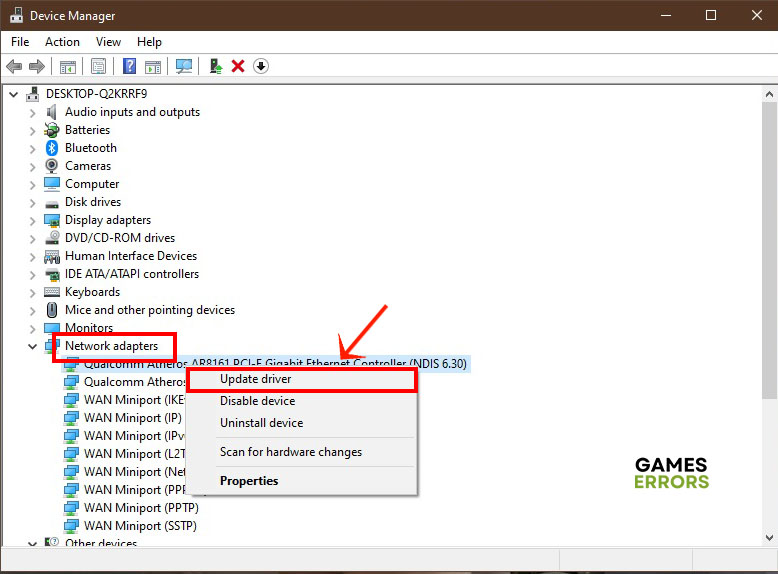
- Press the Windows key + X on your keyboard, and choose Device Manager from the menu.
- Double-click on Network adapters to show your PC network drivers.
- Right-click on your network driver and select Update driver.

- Click Search automatically for driver.
- Restart your PC.
Alternatively, use PC HelpSoft to update your graphics drivers automatically.
5. Perform Clean Boot
Another solution we recommend is to perform a clean boot operation. Follow the steps below:
- Press Windows + I to open the Run command box.
- Type msconfig in the box and press Enter.
- On the System Configuration window, switch to the Services tab, then check the box next to Hide all Microsoft services.
- Click on Disable all, then switch to the Startup tab and select Open Task Manager.
- Click Startup and right-click each of the apps on the list, then select Disable.
- Save the changes, then restart your PC.
Related Articles:

Improve this guide
User forum
0 messages