
Destiny 2 Error Code Stork: How to Fix Quickly
Say goodbye to this annoying network-related error, and say hello to fun with your favorite FPS! 🔫
Network-related errors, like Destiny 2 Stork Error, are annoying because they are unpredictable and can happen to anybody. This error can be caused due to server-side issues or maintenance and the problems on your device. Find out more in the lines below, and learn how can you get rid of it once and for all.
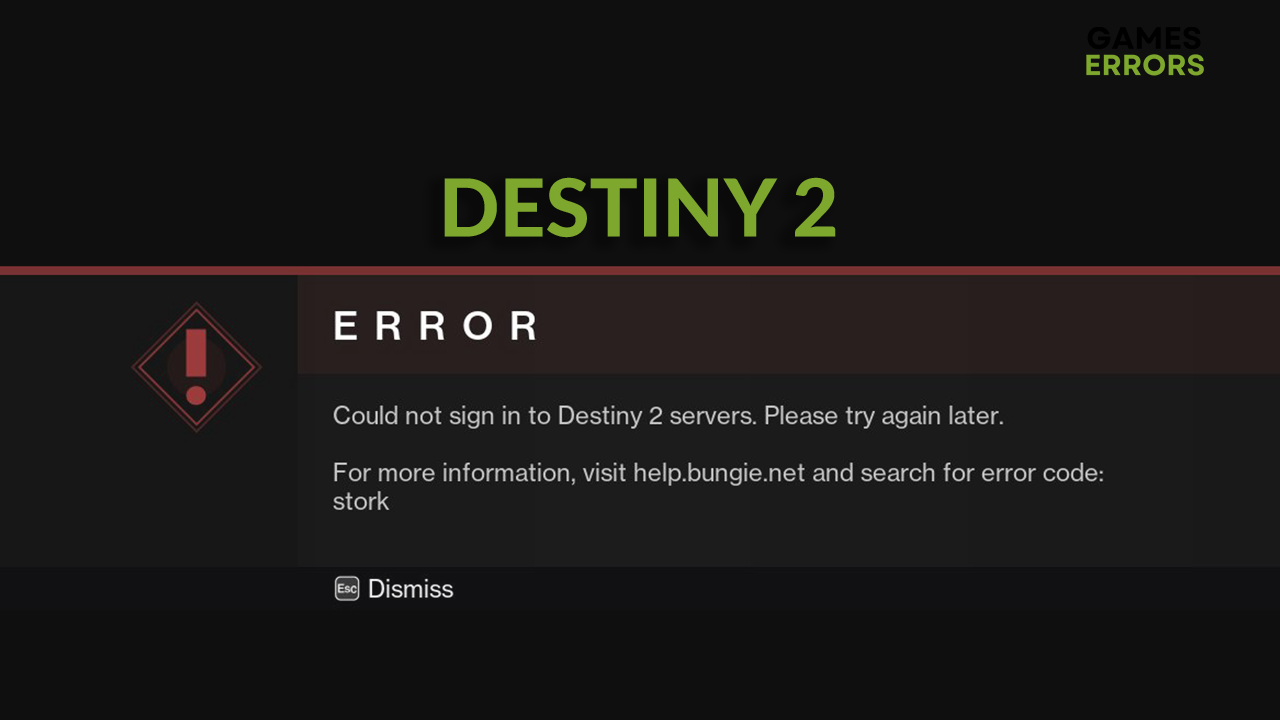
What is Error Code Stork Destiny 2?
Error code Stork in Destiny 2 is a connection error caused by problems on your device, such as an outdated network driver, poor internet connection, faulty game files, or game modifications installed on your device, or by the game-servers related problems such as maintenances, down connections, and errors.
How to fix Destiny 2 Stork Error?
To fix the Destiny 2 Error Code Stork you can either use another Wi-Fi, a cable to connect to your router, update your network driver, restart your network settings and many other fixes with guides found below:
Begin with easier fixes and checks:
- Use a wired internet connection.
- Check if Destiny 2 servers are up and running and if there is scheduled maintenance.
- Restart your network device (router and/or modem) and your PC.
- Ensure your internet speed is at least 1Mpbs.
- Disable VPN if you are using it.
If this doesn’t help you solve this error, proceed with the following solutions:
- Update the network driver
- Restart network settings
- Close background apps
- Verify game files
- Change NAT Settigns
1. Update the network driver
Time needed: 5 minutes
If you experience network issues like Destiny 2 stork error, chances are that it is caused by an outdated network driver. Solve this by updating your network driver using the Device Manager or another driver updater tool.
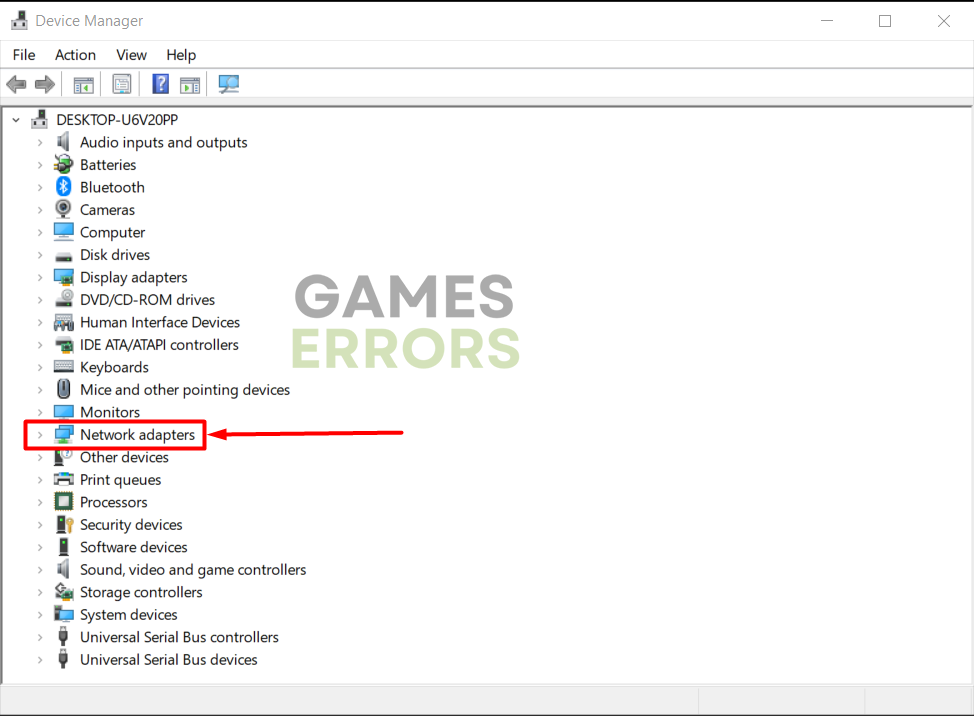
- Click the Windows icon, type Device Manager, and click on it.

- Double-click on the Network adapters.

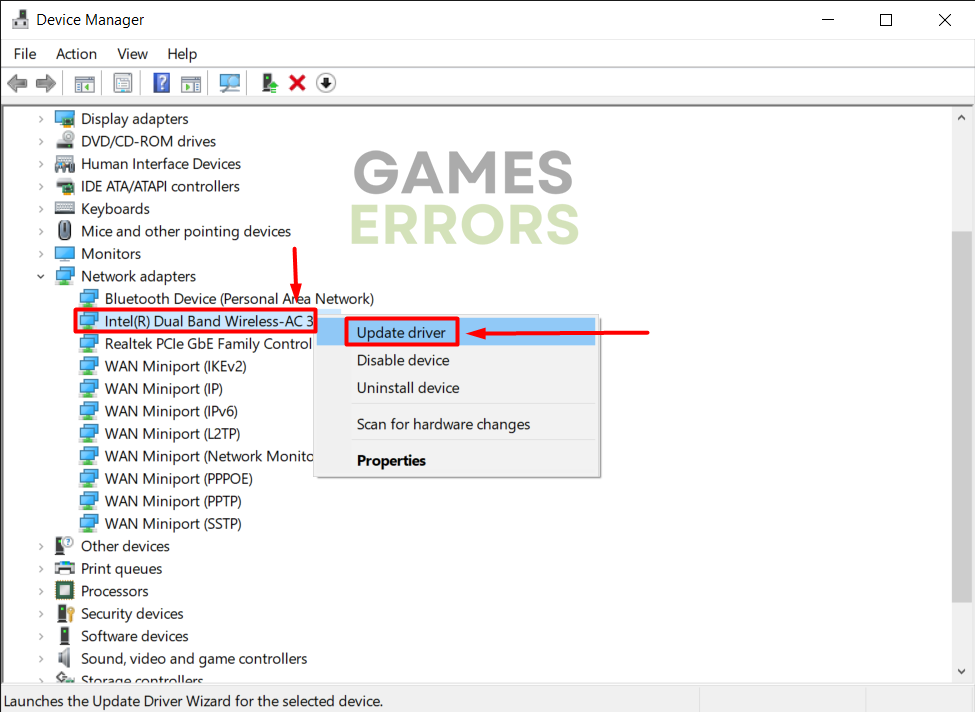
- Right-click on the network device you use for the internet and choose the Update driver option.

- Click on the Search automatically for drivers option in the Update Driver Wizard.
The Wizard will look for suitable driver updates in the driver database.
- Follow the steps given by the Wizard regarding the driver installation.
Double-check using a driver updater tool if no suitable driver update is found.
- Restart your PC and follow any additional steps to complete the driver installation.
A driver updater tool of our choice is PC HelpSoft. This powerful yet convenient tool will manage and update the network driver on your PC for you. It works with any other driver updates and can save a lot of time.
2. Restart network settings
Even when you have the latest network driver installed, faulty network settings can cause Destiny 2 to show the error code stork instead of the main menu. Use the command line to restart all network settings on your PC.
- Click on the Windows icon, type Command Prompt, and click on it to open it.
- Paste the commands below, one by one, and press Enter after each command.
ipconfig /flushdns
ipconfig /registerdns
ipconfig /release
ipconfig /renew
netsh winsock reset
- After the process is completed for the last command, restart your PC to apply all changes.

3. Close background apps
Apps running in the background use resources even if you are not actively using them. What is particularly important with Destiny 2 stork error is the network bandwidth that can also be used by background apps.
- Open the Task Manager using the CTRL + Shift + ESC shortcut.
- Find apps using internet bandwidth (check the Network column).
The values are in Megabits per second (Mbps). - Right-click on apps and click on the End task option.

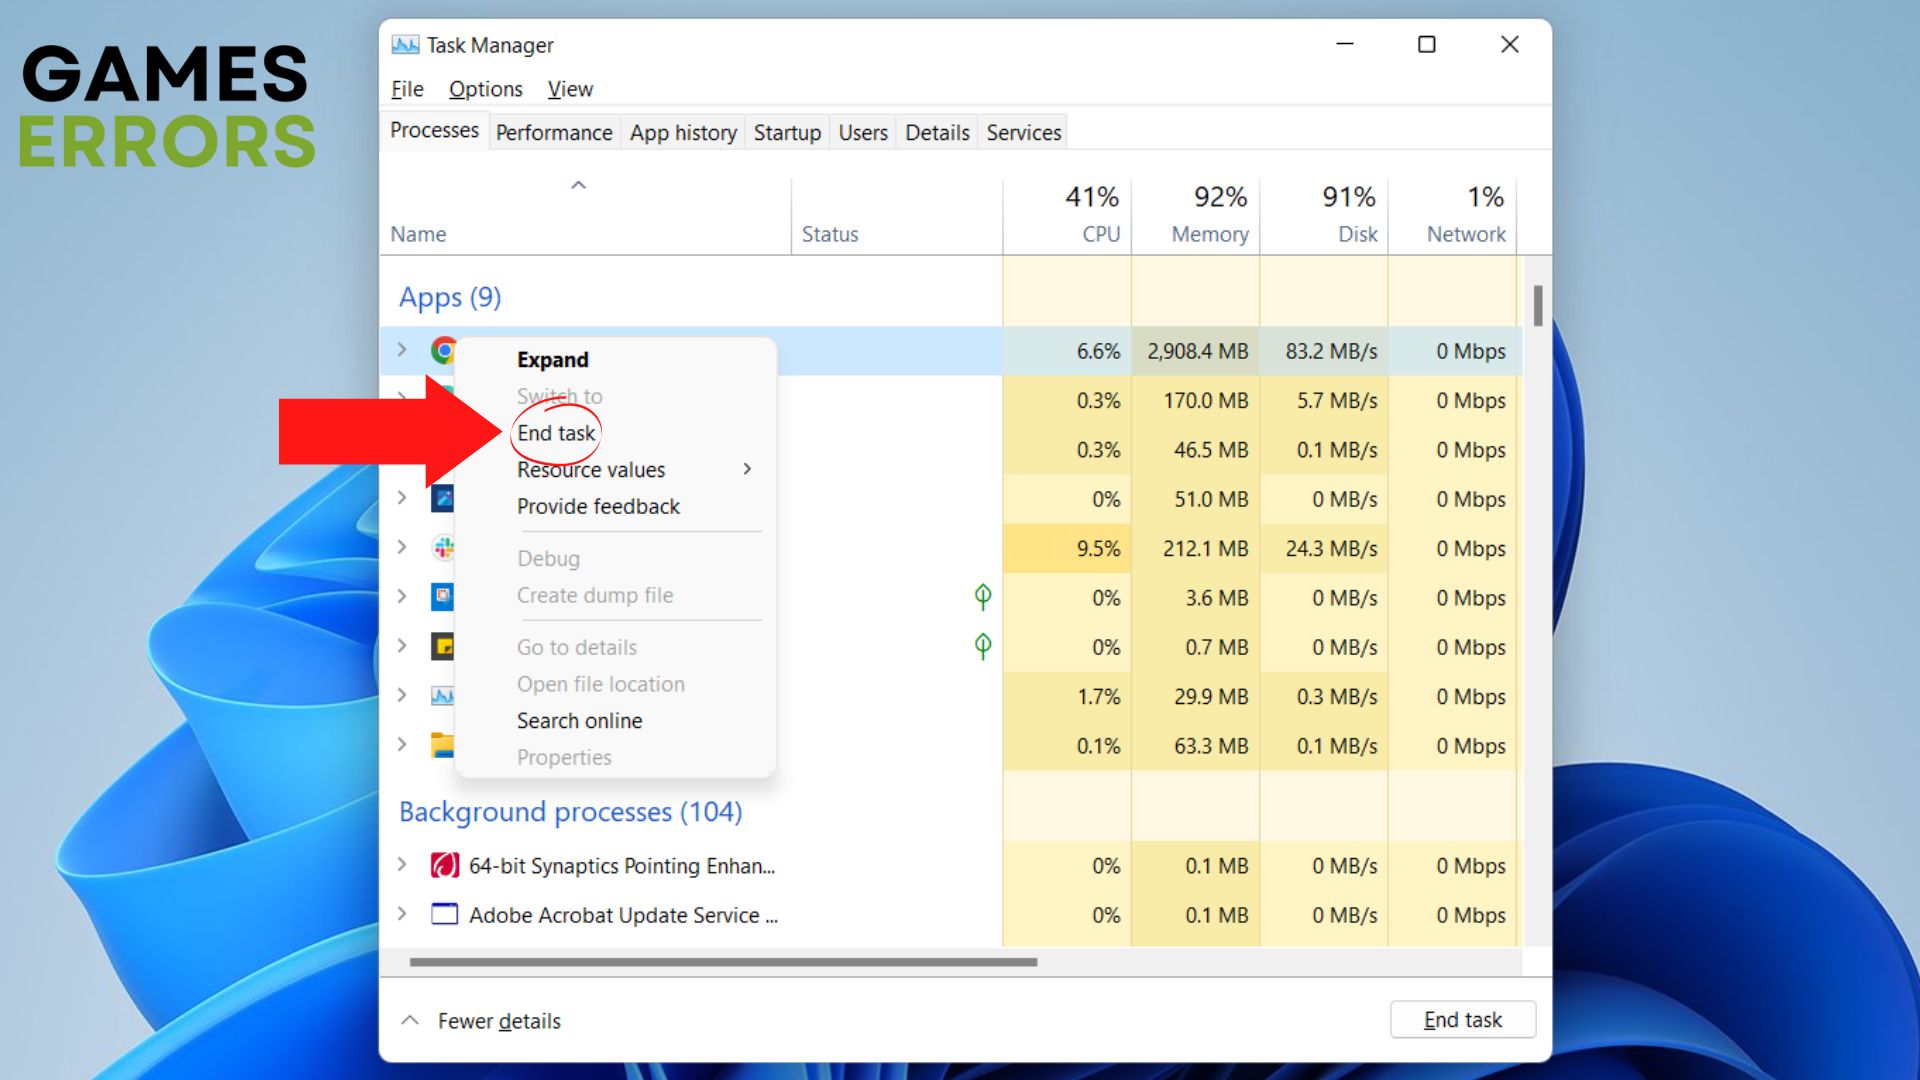
⚠ Never close apps and background processes used by Windows or your security software. Doing so might result in system malfunction and security vulnerabilities.
4. Verify game files
Faulty game files are known as usual suspects with game errors. You don’t have to reinstall the whole game and download 100GB+ game files. Simply use the game file verification system on your game-distributing platform.
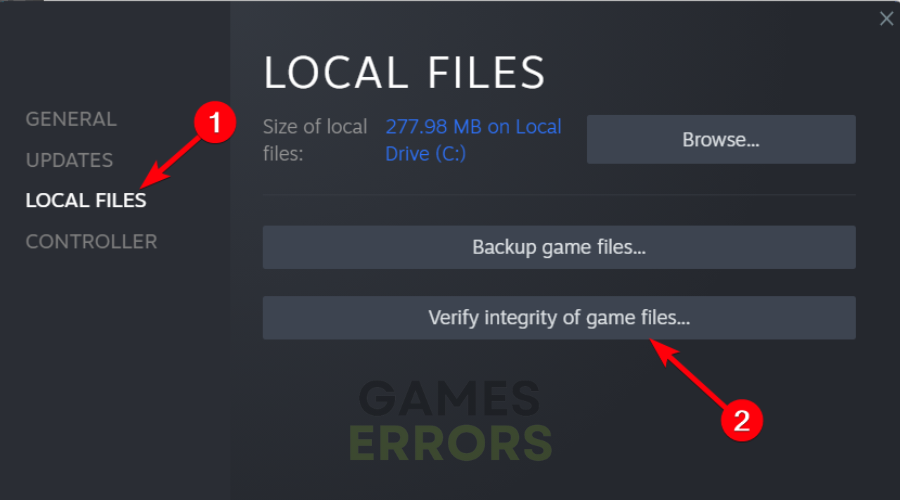
For Steam users:
- Open Steam and head to the Library.
- Find Destiny 2 in the Library, right-click on the game, and select Properties.
- Select the Local Files section in the panel on the left.
- Click on the Verify integrity of game files… button.

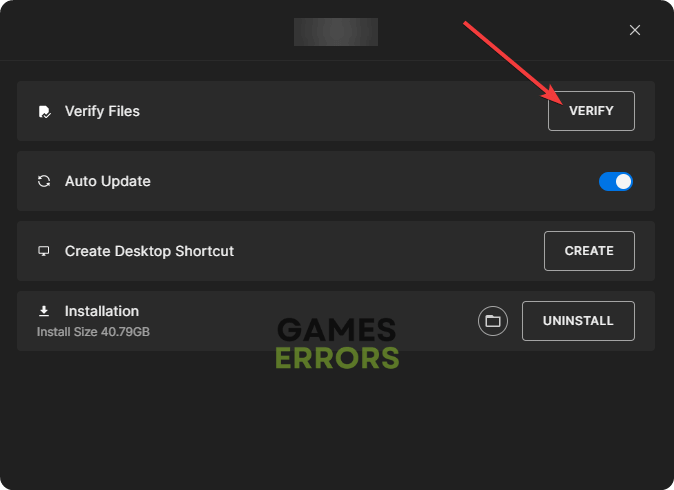
For Epic Games users:
- Open Epic Games Launcher and head to the Library.
- Find Destiny 2, click the three vertical dots next to it, and select Manage.
- Click on the Verify button.

👉 After the verification, Steam/Epic Games will inform you if corrupted files are found and what actions (if any) you must take.
5. Change the NAT settings.
NAT, long form Network Address Translation, is a process that allows your private IP address to function on the internet as a public network address. You might think of it as a safeguard. To configure NAT you must either enable UPnP or port forwarding.
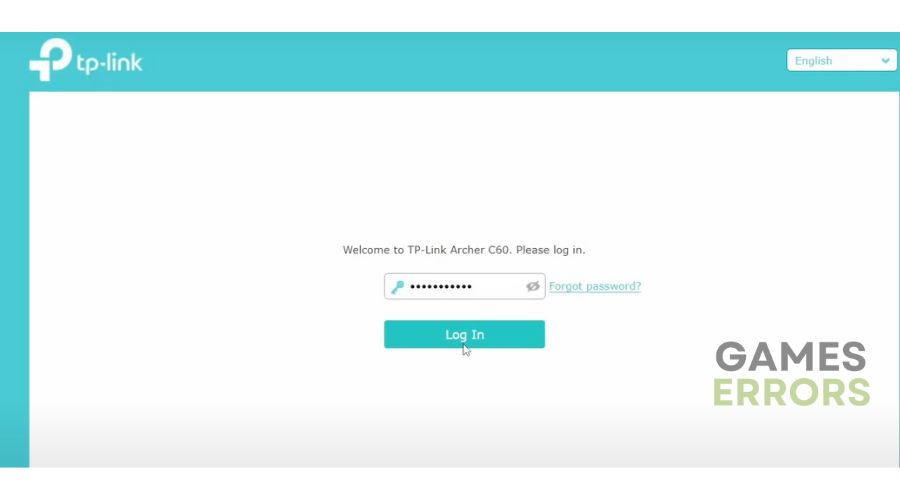
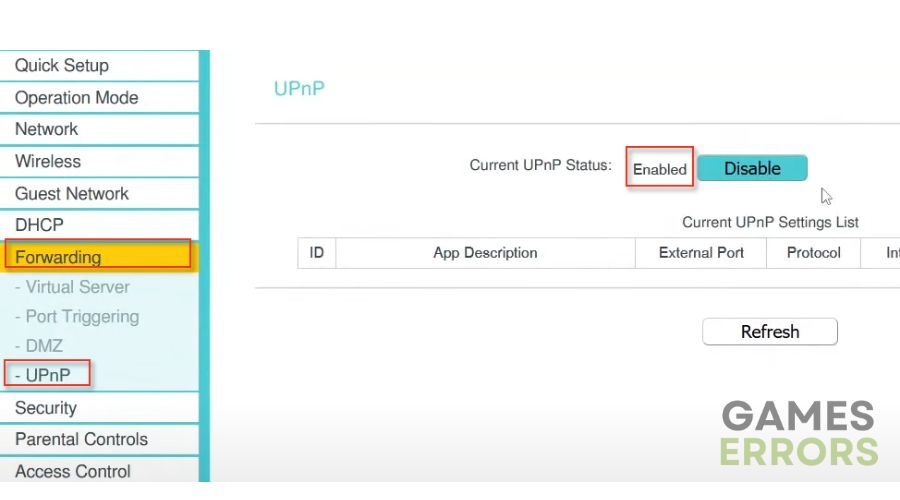
Enable UPnP
- Log in to your routerLog into your router control panel via the admin account.
- Find the UPnP optionFind the UPnP setting in the router menu and select Enable.
- Exit router settings and launch Destiny 2If the game works as it should, and without the Centipede error code, you have solved the problem
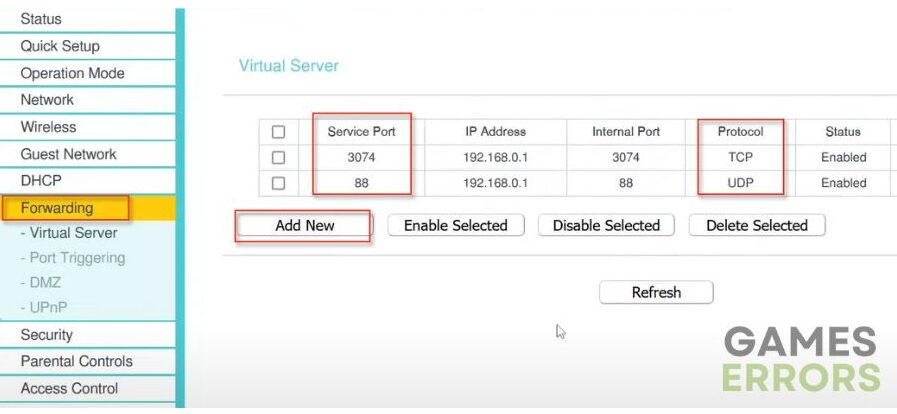
Enable port forwarding
1. Disable UPnP in the router menu.
2. Choose the Port forwarding option.
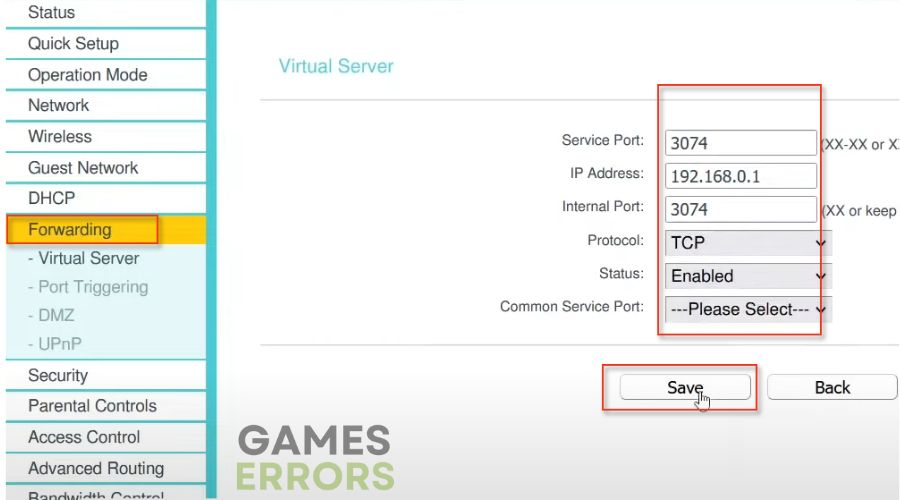
3. Enter the recommended UDP and TCP ports in the respective boxes and click Save.
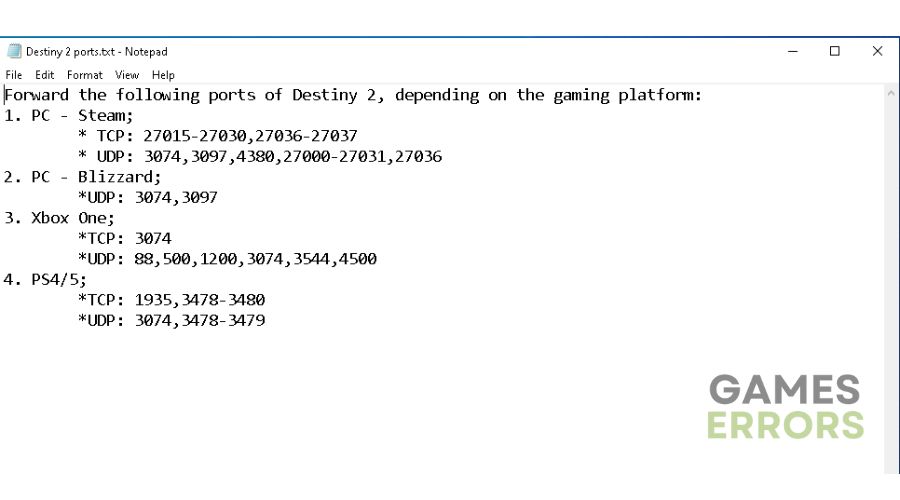
4. Repeat the process until you have entered all the ports via the Add New option.
Extra steps
In some cases, none of the previously mentioned solutions will work, so the best idea is to:
- Try to play the game on a different internet connection (try with a mobile hotspot).
- Update your Windows.
- Disable any 3rd party modifications (mods) you use in Destiny 2.
Related articles:
- Error Code Bee In Destiny 2: How To Fix It In A Flash
- Destiny 2 Graphics Runtime Error Code Broccoli: How To Fix it
- Error Code Weasel In Destiny 2: What Is & How To Fix It Easily
- Destiny 2 Error Code Anteater: How To Fix This Network Error
- Destiny 2 Error Code Calabrese: How To Fix
- Destiny 2 Error Code Centipede: How To Fix It In 2 Minutes
Conclusion
If you applied all of the solutions from the list, you will likely not experience Destiny 2 stork error. However, if you still have issues, let us know, and we will do our best to help you fix this annoying problem.

Improve this guide
User forum
0 messages