
How to Install Battle.net on Steam Deck [A Guide]
Want to play Blizzard games on Steam Deck but can't? Here's a guide on how to install Battle.net on Steam Deck to access Blizzard games 😉.
Battle.net is Blizzard‘s official game launcher, which gamers use to access and play many Blizzard games. While Battle.net is available for use on PC, it doesn’t officially support the Steam Deck. So, fans who want to play exciting games like Overwatch 2, Diablo 4, and World of Warcraft on their handheld device cannot.
This can be pretty frustrating when you want to play games on the go via your Steam Deck. Luckily, while Battle.net doesn’t support the Steam Deck, you can quickly get your games running on SteamOS. In this article, we’ll explain how to install Battle.net on Steam Deck.
How to install Battle.net on Steam Deck
Before diving into the step-by-step guide, we recommend using a keyboard and mouse to install Battle.net on your Steam Deck. It’ll make the process easier and much smoother as opposed to using Steam Deck’s on-screen keyboard and controls.
Now, here’s how to install Battle.net on Steam Deck. It’s quite a lengthy process, but we’ve made it as simple as possible:
1. Switch to desktop mode
The first step to installing Battle.net on Steam Deck is to swap from gaming mode to desktop mode. To do this:
- Press the Steam Button and click Power.
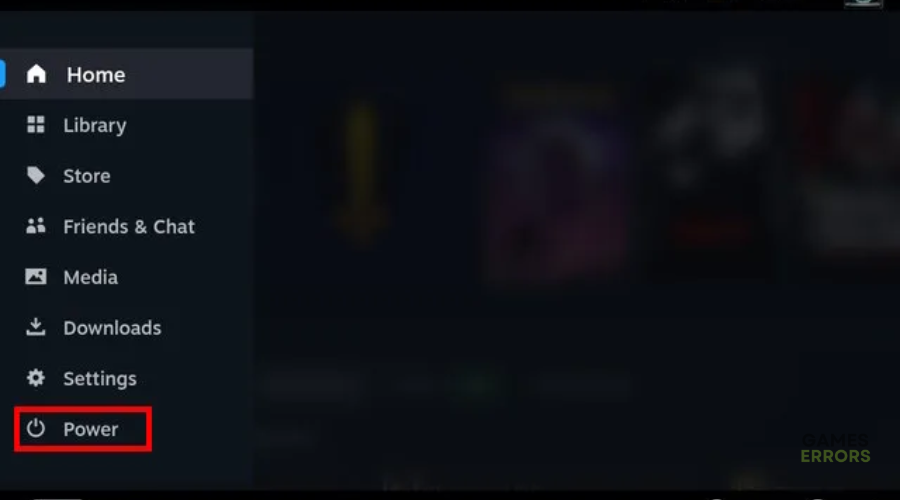
- From the list of options, click Switch to desktop mode.

- Your Steam Deck will automatically switch from game mode to desktop mode.
2. Download the Battle.net client on Steam Deck
Now that you’re in the desktop mode, we can download the Battle.net client installer on your Steam Deck. To do this:
- Open any browser on your Steam Deck and go to the following page.
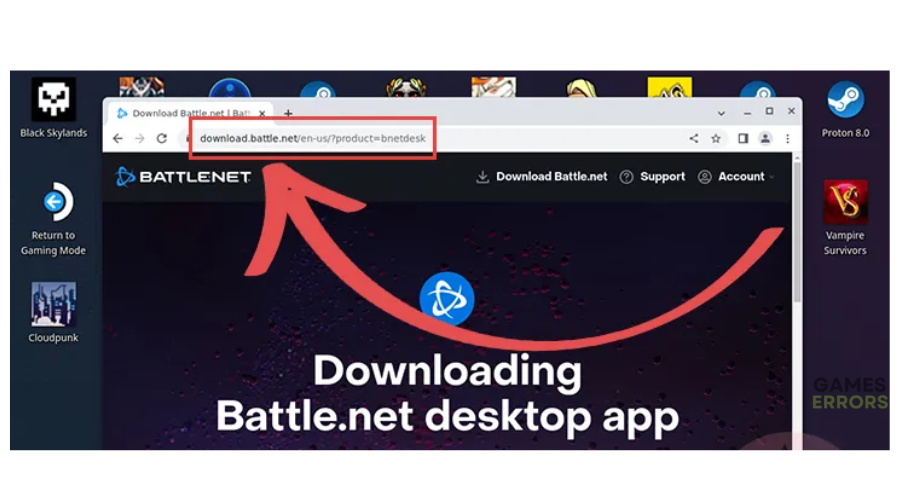
- Once you open the URL, the download should begin automatically. Wait for the process to complete.
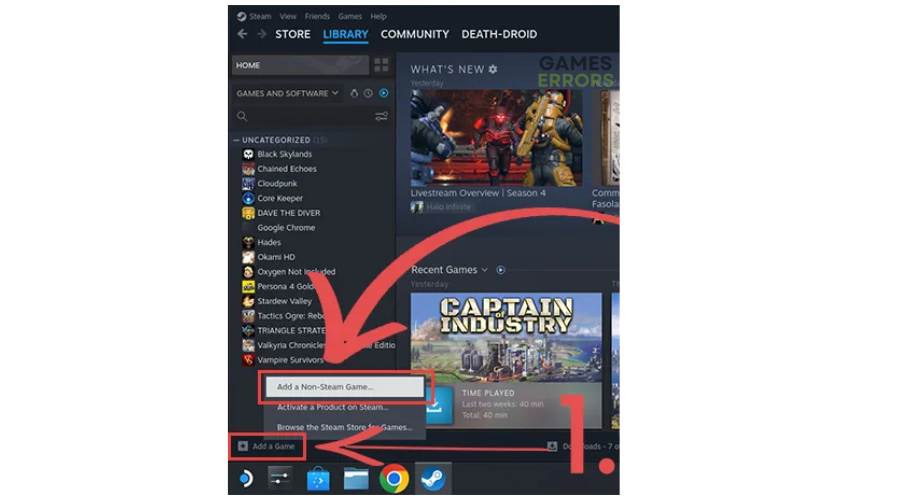
3. Add Battle.net to your Steam Library
After downloading, you must add the Battle.net folder to your Steam Library. To do this:
- Go to your Steam Deck desktop and click the Steam icon.
- At the bottom left corner on the left pane, click Add a game.
- In the new context menu that pops up, select Add a non-steam game.
- Next, click Browse and navigate to the Downloads folder. Here’s where you’ll find your Battle.net client. Select it and click Open at the bottom right corner.
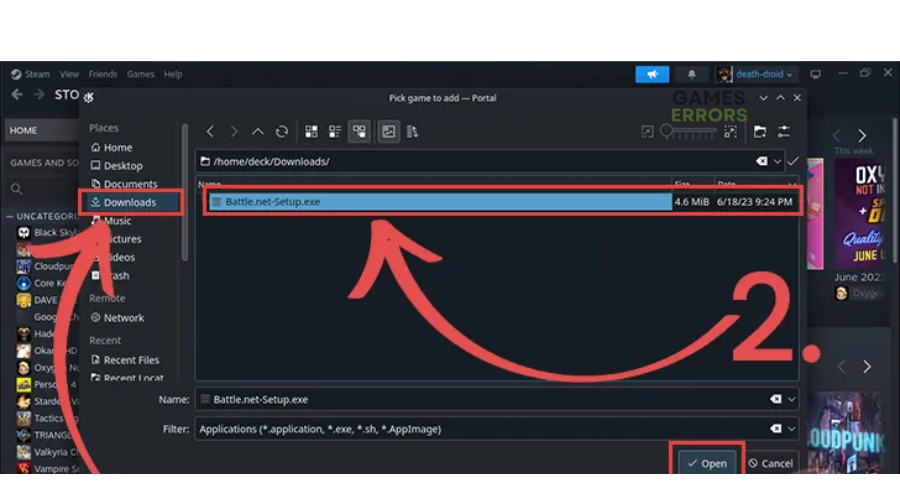
- In the new context menu that pops up, ensure the Battle.net-Setup.exe folder is selected. If it’s not, check the box next to it.
- Now, click Add Selected Programs to add Battle.net to your Steam Library.
4. Change Battle.net on Steam Deck’s compatibility option
Here’s how to do this:
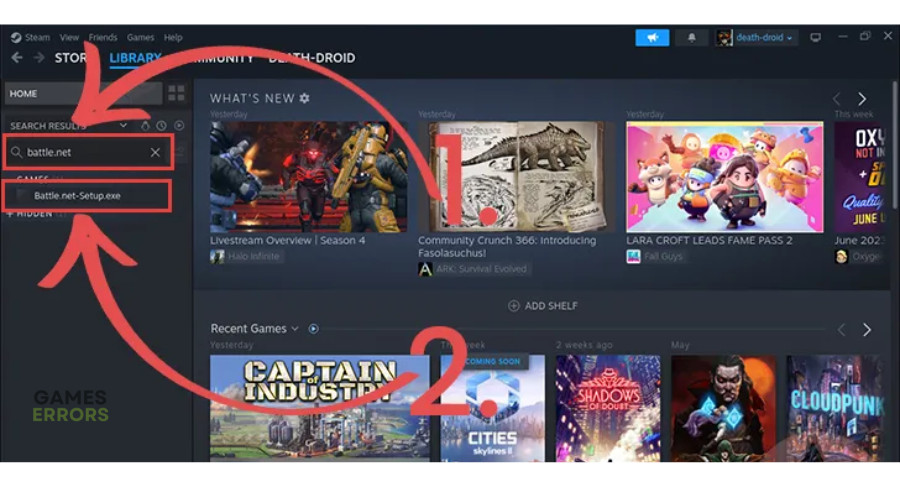
- Open the Steam client on your Steam Deck.
- Click Library and type Battle.net in the search bar.
- You’ll see the Battle.net-Setup.exe folder. Click it to open.
- Once it opens, click the cog icon at the bottom left corner.
- A pop-up menu will appear. Select Properties.
- Use the sidebar to navigate to the Compatibility tab.
- You’ll see a checkbox labeled Force the use of a specific Steam play compatibility tool. Check it to ensure it’s enabled.

- Next, set the Proton version to Proton Experimental.
5. Install Battle.net on Steam Deck
Now, you can install Battle.net on your Steam Deck. To do this:
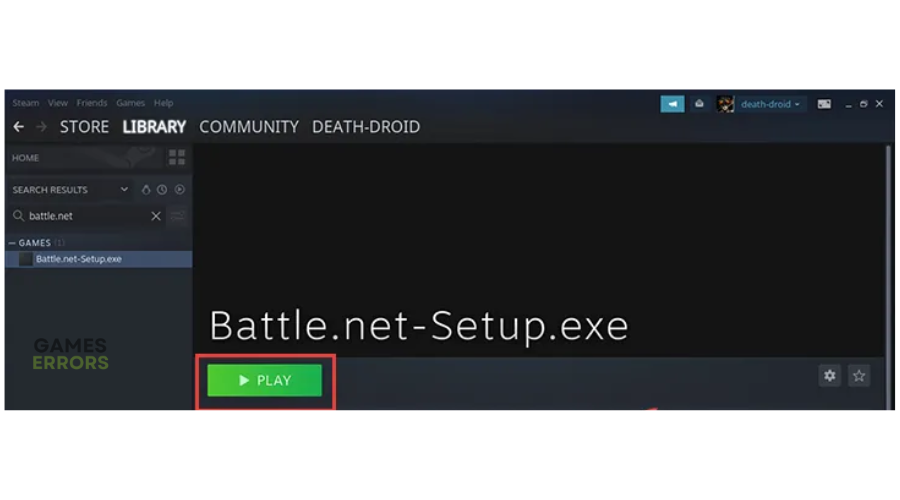
- Open the Steam client on your Steam Deck.
- Click Library and type Battle.net in the search bar.
- You’ll see the Battle.net-Setup.exe folder. Click it to open.
- Click the Play button within the Steam launcher.
- You’ll be prompted to select the language you wish to use. Choose your language and tap the continue button.
- Next, select Continue in the new window that pops up. Don’t change the default Battle.net install location on your Steam Deck.
- Next, select your region and click Continue.
- Wait for the installation process to complete before logging your Steam Deck onto the battle.net launcher.
- To log in, enter your email and password and click Keep me logged in.
6. Add the installed launcher to Steam
To do this:
- Open the Steam client and go to the Library.
- Click on the plus sign at the bottom left corner and select Add a non-steam game.
- Click the Options symbol in the top-right of this window and check Show Hidden Files.

- Next, click Browse and navigate the following path directory: home/deck/.local/share/Steam/steamapps/compatdata/.
- Once you’re in compatdata, scroll until you find the most recently created folder. It should be a 10-digit number.
- Open it and navigate to the following folder: pfx/drive_c/Program Files (x86)/Battle.net.
- Here, you’ll find an executable folder named Battle.net Launcher.exe. Select it and click Open.
- Then click Add Selected Programs to add it to Steam.
- Now, follow Step 4 to change Battle.net-Setup.exe compatibility.
- Now, you’ve successfully installed Battle.net on Steam Deck.
Related articles
- BN-3048 Error Code in Battle.net: How to Fix [Explained]
- How To Connect PS5 Controller To Steam Deck
- Steam Deck Not Connecting To Wi-Fi: How To Fix It With No Hassle
Conclusion
That’s it! Hopefully, you can now enjoy Blizzard games on your Steam Deck.

Improve this guide
User forum
0 messages