
Destiny 2 Error Code Monkey [Quick Fix]
There are no monkeys in the game, but the error code says differently. Join us as we discover the fix for this network-related issue. 🙉
Did you get the Destiny 2 error code Monkey, and you have no idea what it can mean? You are not alone! Many Destiny 2 gamers experience the same issue these days, so we compiled a list of the most common cause and fixes for this network-related issue.
🐝 If you experience the error code named after another animal, learn how to fix the error code Bee in Destiny 2.
What is the Monkey error code in Destiny 2?
Destiny 2 error code Monkey is a general networking error caused by a slow internet connection, temporary problems with networking devices, weak wireless internet signal, incorrect DNS settings, an outdated network driver, misconfigured network settings on your PC, or an unreliable VPN.
How to fix Destiny 2 error code Monkey?
To get rid of this error code, apply these checks and fixes:
- Check your internet connection: Head to the Google Speed Test and check your download/upload rates and latency. Ideally, you want higher speeds and lower latency (ping).
- Restart networking devices: Find the devices managing your network. Usually, these are routers and modems. Press the restart button located on the backside of the device.
- Use a wired connection: The best way to avoid network-related error codes caused by an unstable network is by using an ethernet cable to connect to it.
Proceed with the step-by-step solutions if the error code Monkey still appears in Destiny 2.
1. Use the Google DNS
Time needed: 3 minutes
Domain Name System is used to help your devices navigate the internet. Windows will assign you a suitable DNS server address by default, but we recommend you use a proven Google DNS with excellent performance.
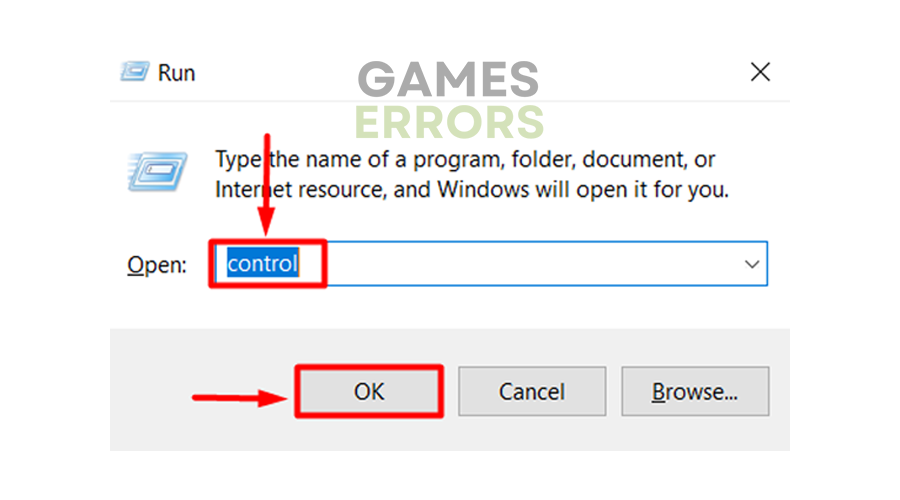
- Use the Windows Key + R shortcut to open the Run dialog, type control, and hit OK.

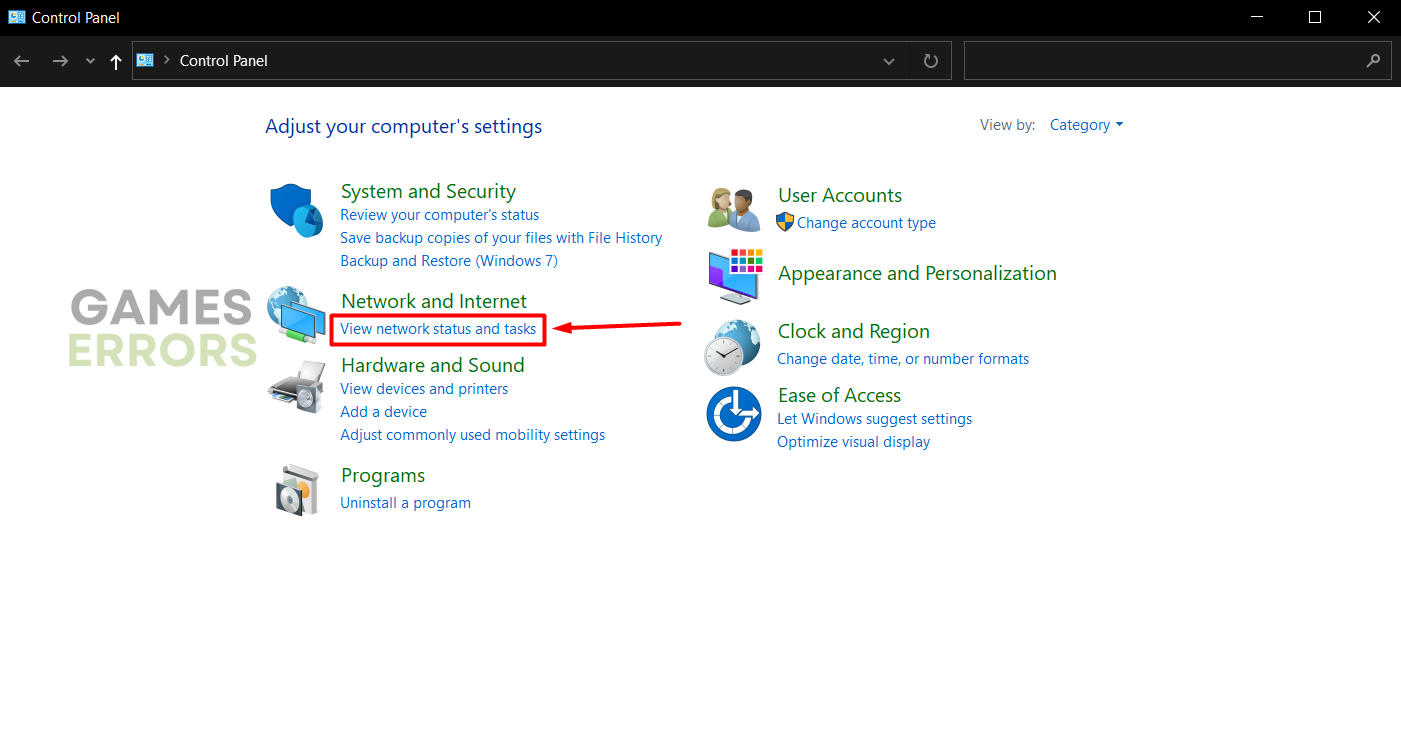
- Choose View network status and tasks under the Network and Internet section.

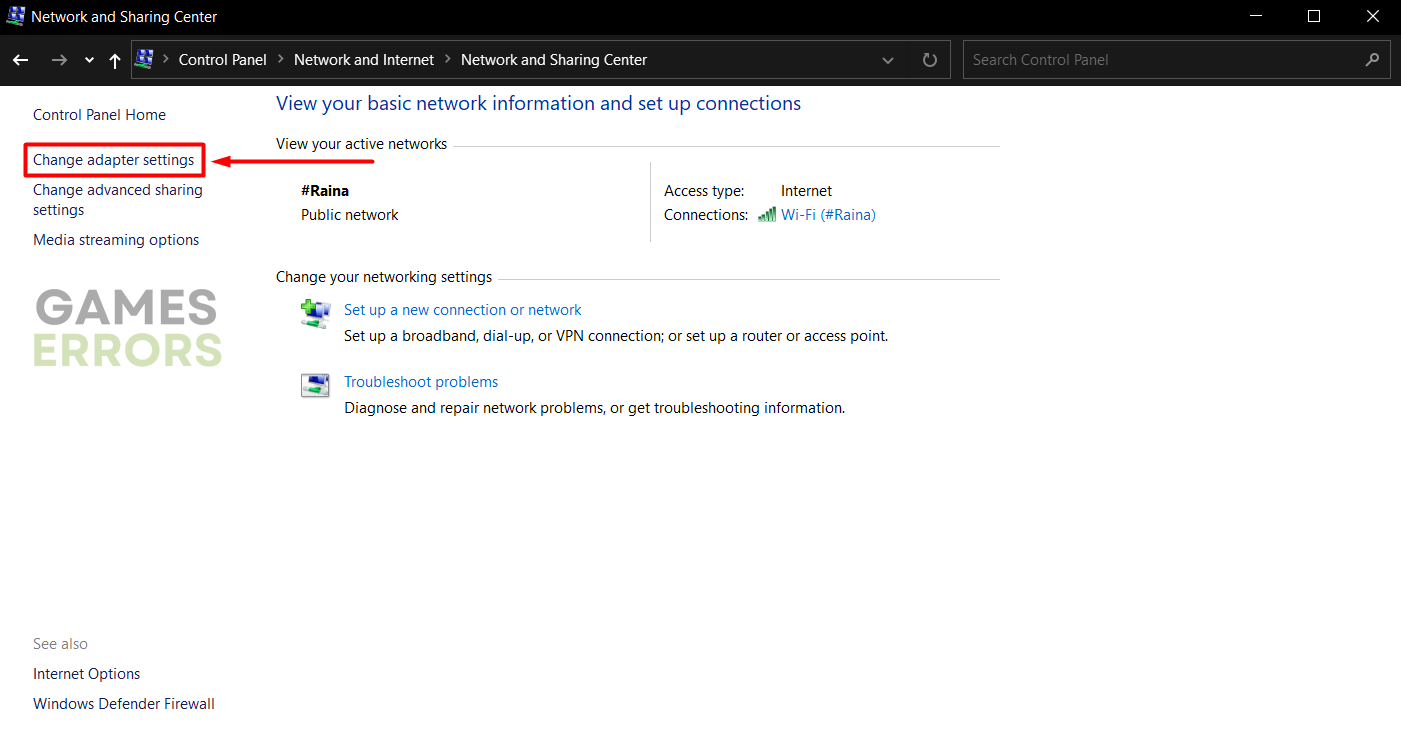
- Click on the Change adapter settings in the panel on the left.

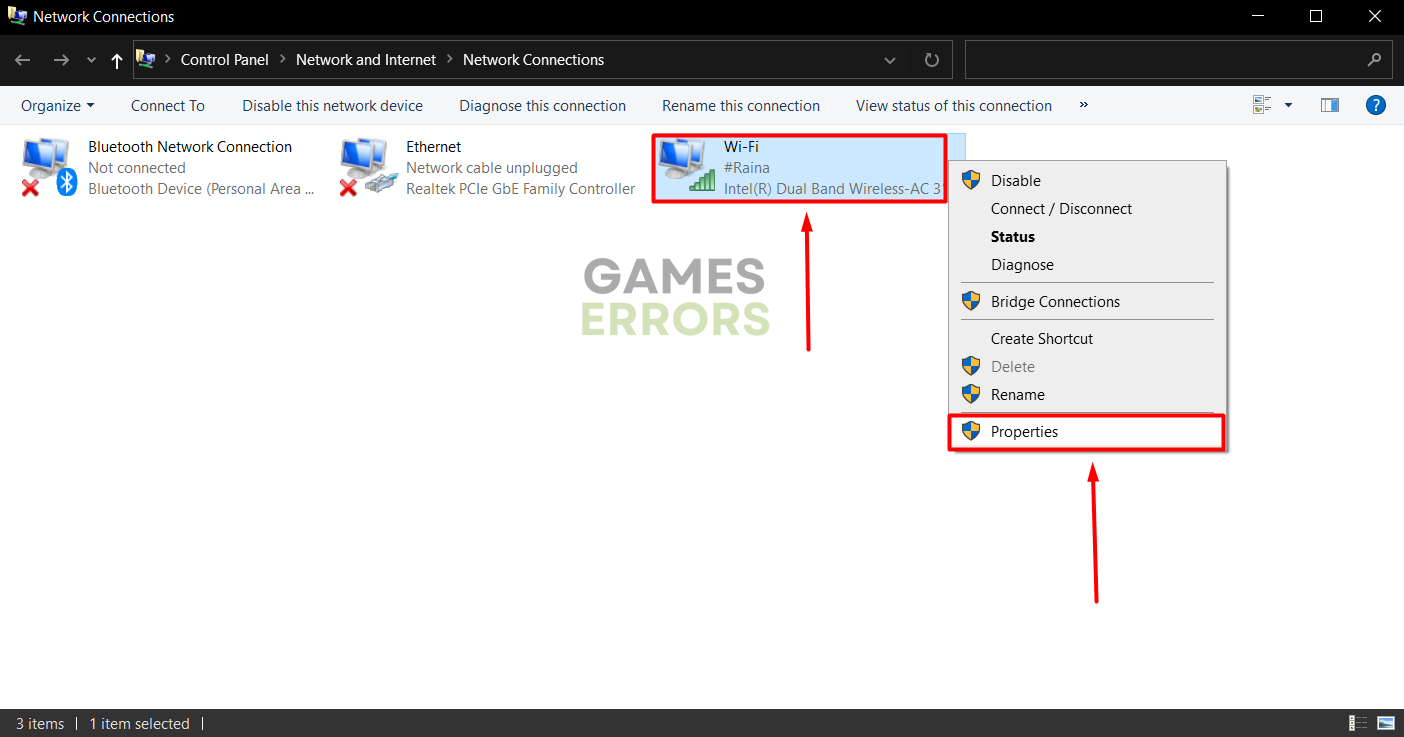
- Right-click your internet network and select Properties.

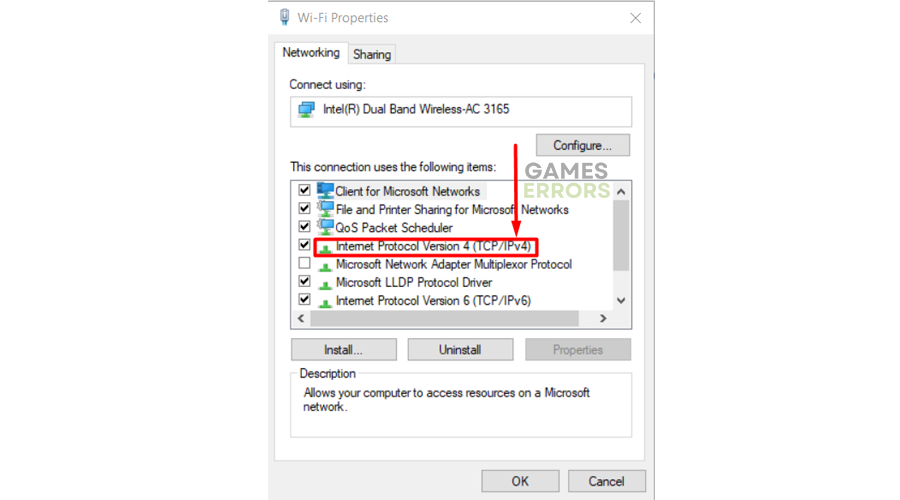
- Double-click Internet Protocol Version 4 (TCP/IPv4).
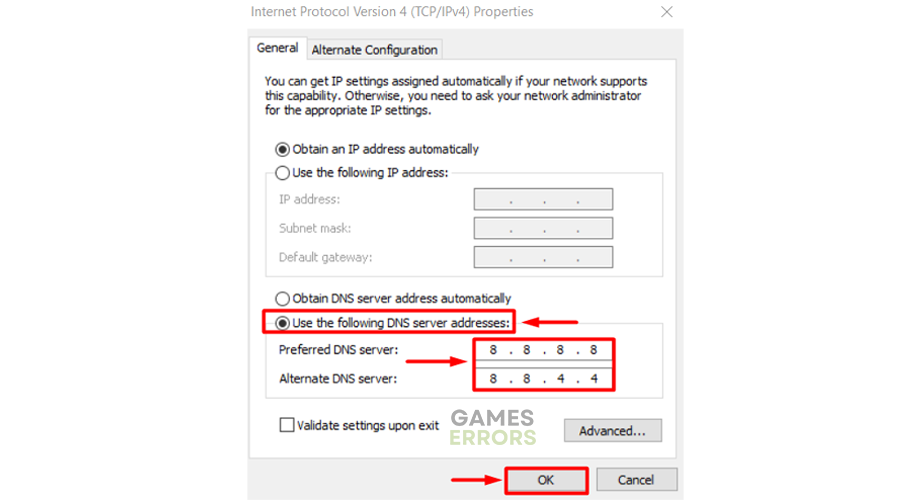
- Enable manual DNS server addresses and set the following addresses:
➡ 8.8.8.8 for the Preferred DNS server
➡ 8.8.4.4 for the Alternate DNS server - Press the OK button and restart the PC.
2. Update the network driver
A network adapter is a device in your PC responsible for communicating with your home network. However, it needs a suitable network driver for this to happen, so our advice is to check if a network driver update is available for your adapter.
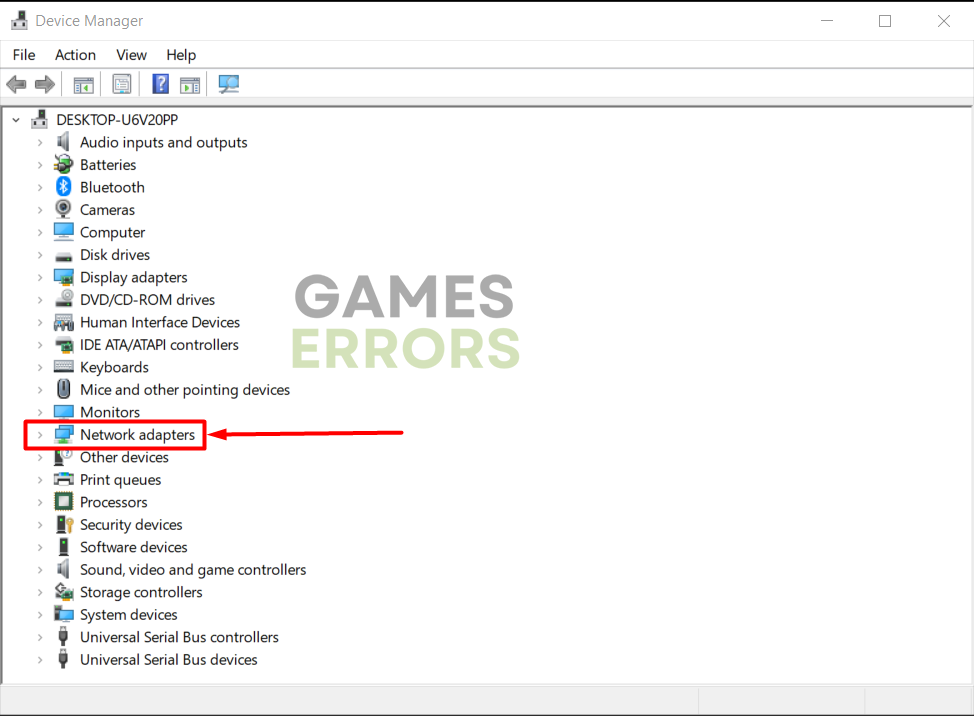
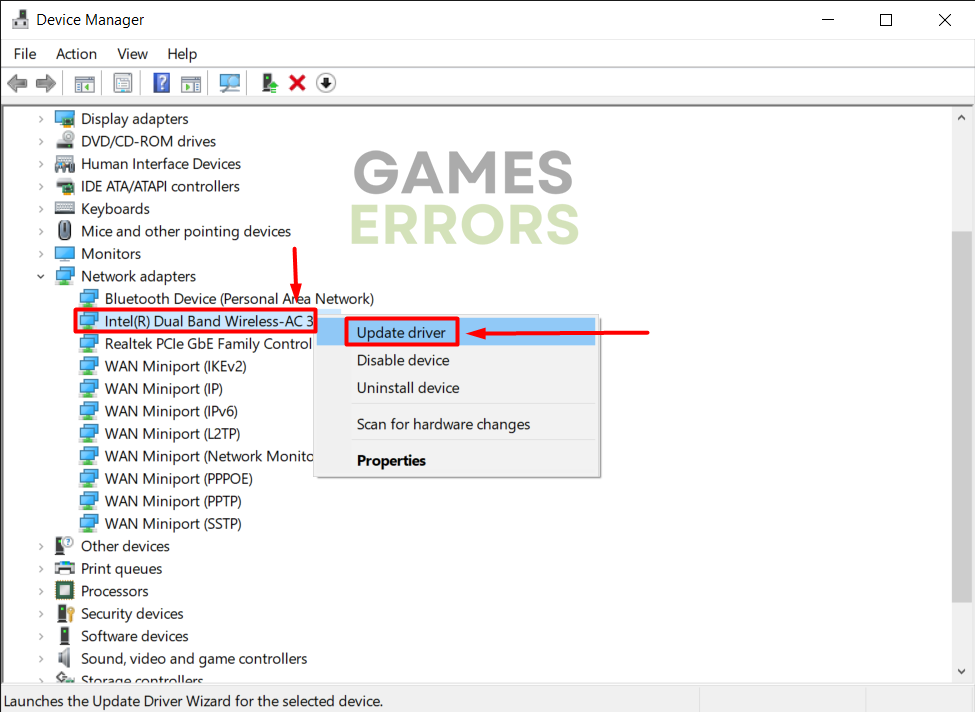
- Click the Windows icon, type Device Manager, and open it.

- Double-click on the Network adapters.

- Right-click on the network adapter and select Update driver.

- Choose the Search automatically for drivers option.
- Install the driver update.
- Restart your PC.
Why bother manually installing drivers when you can delegate the responsibility to a driver updater tool? Our choice is PC HelpSoft, a swift, portable, and easy-to-use tool.
3. Restart network settings
Some of the network settings are stored on your PC. These settings can get mixed up and cause the error code Monkey in Destiny 2, so we advise you to restart them with Command Prompt and a few commands.
- Click on the Windows icon, type Command Prompt, and open it from the search results.
- Type the following commands in separate lines and hit Enter after each one:
ipconfig /flushdns
ipconfig /registerdns
ipconfig /release
ipconfig /renew
netsh winsock reset
- Restart your PC.

Extra steps
Some gamers will find getting rid of the Destiny 2 error code Monkey more challenging. If you are one of them, try to:
- ❌ Disable the VPN: Some gamers claim that the issue disappeared after they disabled their VPN software.
- 🌐 Connect to another network: Ideally, you have access to an alternative internet network to connect using an ethernet cable.
- 👾 (Alternative) Use another class: If nothing so far fixed the error code Monkey in Destiny 2, the chances are the error is not on your end. One workaround is to switch between Titan, Hunter, and Warlock.
- 📞 Contact the support: Check with your ISP provider if everything is OK with the network, or contact Bungie Help via the official Twitter profile.
Related articles:
- Destiny 2 Stork Error: Fix It Quickly
- Destiny 2 App Not Working [Quick Fix]
- Destiny 2 CAT Error: Fix It Quickly
- Destiny 2 Voice Chat Not Working: Fix It Quickly
- Destiny 2 Stuck On Signing In [Quick Fixes]
Conclusion
We hope you are no longer thinking about the Destiny 2 error code Monkey and that you are enjoying the mythical Sci-Fi world within Destiny 2. Comment to share what solution worked out for you or if you find another working fix.

Improve this guide
User forum
0 messages