
Hogwarts Legacy Keeps Crashing: Why & How to Fix Guide
If Hogwarts Legacy keeps crashing on PC, make sure to verify the minimum specs of the game & keep your GPU drivers updated 🎯
Many players reported that Hogwarts Legacy is crashing on their PCs, turning the magical adventure into a technical nightmare. If you’re also facing this issue, do not panic! You are not alone.
Like every other game that runs smoothly on your PC, you can expect good performance for this masterpiece almost most of the time, unless Hogwarts Legacy keeps crashing on your PC or console. And while this happens rarely, it seems to be pretty common to experience random crashes while playing Hogwarts Legacy.
We are here to take your worries away with our fixes and solutions. The best part is that most of them worked for other players and for us.
Why does my Hogwarts Legacy keep crashing? 💥
The main reason why Hogwarts Legacy keeps crashing is because a device doesn’t meet the system requirements or because gamers are trying to play this title on the highest graphics available. However, if that’s not the case for you, here are some other common reasons why Hogwarts Legacy crashes:
- System requirement problem: If your computer doesn’t meet the required system requirements, Hogwarts Legacy will most likely crash at startup or during the gameplay.
- Outdated graphics card driver: Outdated GPU driver is one of the most common problems that can cause any high-end game crashing problem.
- Very old GPU: Some graphics cards will not perform well even after using the latest driver due to being very old.
- Compatibility problem: If the Hogwarts Legacy has some compatibility issues with your current operating system, it can be the reason you are facing unexpected crashing issues.
- Corrupted game files: When the required game components are missing or corrupted or something just altered, the game will crash.
- Third-party app or service: Hogwarts also may crash due to any background processes that are interfering with the gameplay.
You may also have noticed the Hogwarts Legacy crashing on startup, after an update, or on the loading screen. Don’t worry, our solutions will fix this problem in no time.
How do I fix Hogwarts Legacy crashing?
To fix the Hogwarts Legacy crashing problems, make sure that the game is updated. There might be a fix in one of the patches. Yet, if you have the latest version and the game crashes randomly, try all the solutions below:
We have found the most effective methods to get rid of the Hogwarts Legacy crashing problem. However, before going through the main methods, we want you to apply these basic fixes:
- Make sure that your PC meets the recommended or at least minimum Hogwarts Legacy system requirements.
- Update Windows to the latest version.
- Ensure that there is enough free disk space after installing the game.
- Disable your antivirus temporarily and see if it helps.
- Close background apps
If you still continue facing the same problem, do the following things to solve this crashing issue:
- Update graphics card driver
- Disable unnecessary background processes
- Run the game as an administrator
- Verify the game files
- Clean boot
- Disable ray-tracing
- Disable over-clocking on your GPU
- Enable/disable V-sync
- Lower in-game graphics
- Download the Latest Version of DirectX
- Disable Control Flow Guard (CFG)
- Re-install the game
- Change Graphic Settings accordingly
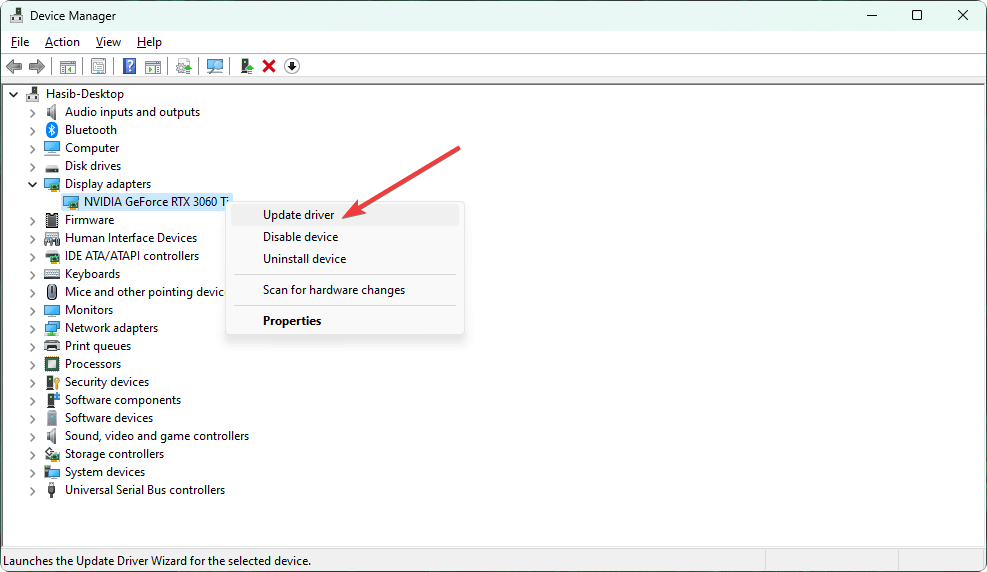
1. Update graphics card driver ✅
Time needed: 4 minutes
To tackle this crashing problem, you should update the graphics card driver to the latest version before trying other methods. It is because, in most cases, the driver issue is the most common reason that triggers this type of problem.
To update the GPU driver from your Windows PC, follow these steps:
- Open the Windows search box, type devmgmt.msc, and press Enter to open the Device Manager.
- Find and expand the Display adapters.
- Right-click on your graphics card, for example, NVIDIA GeForce RTX 3060 Ti, and click on Update driver.

- Click on Search automatically for drivers.
- Wait until Windows finishes searching.
- Install the new driver by following any on-screen steps.
We also suggest you use PC HelpSoft to update the graphics card driver. Windows Device Manager often fails to get the latest driver. But third-party tools like PC HelpSoft can easily update any drivers on your PC and solve game crashing problems.
⇒ Get PC HelpSoft
We also strongly recommend checking our dedicated guide on how to update your graphics driver for better gaming performance. There, you’ll discover some detailed explanations that might help.
Now, see if it has solved the Hogwarts Legacy crash problem or not. If not, go through the next methods.
2. Disable unnecessary background processes
To provide Hogwarts Legacy more room to utilize system resources and reduce the possibility of third-party service interference with the game, disable as many unnecessary background tasks as possible. For this, follow these steps:
- Right-click on the Taskbar and go to Task Manager.
- Make sure you are in the Processes tab.
- Select the process you want to disable and click on End Task.

- Do it for any unnecessary background tasks which are related to third-party software.

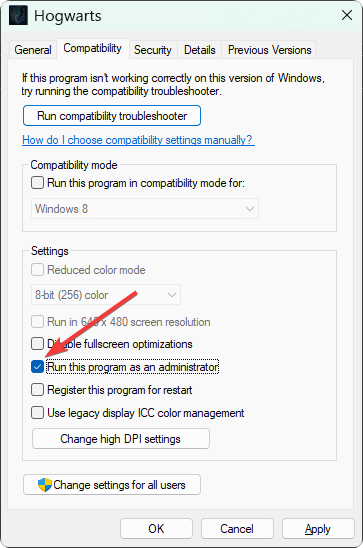
3. Run the game as an administrator
If you encounter the Hogwarts Legacy crashing on startup issue, try to run the game as administrator. For many users, it has worked like magic. Here are the steps to do it:
- Locate the game installation folder.
- Right-click on the hogwarts.exe file and go to its properties.
- Navigate to the Compatibility tab.
- Tick Run this program as an administrator.

- Click on Apply and OK.
- Launch the game.
4. Verify the game files
Most of the Hogwarts Legacy crash problems could be the result of corrupted, missing, or faulty game files. However, you can be fix this problem in a matter of minutes by using the verify integrity of game files option provided by most launchers. If you don’t know how to do it, follow the steps below:
- Open Steam.
- Right-click on Hogwarts Legacy and go to Properties.
- Go to the Local files tab.
- Click on Verify integrity of game files.

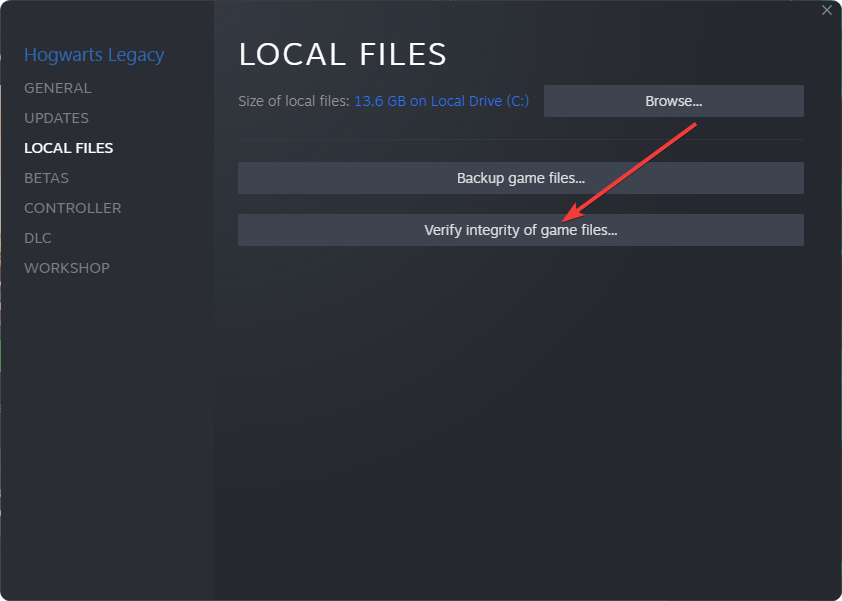
If you have another game launcher other than Steam, we suggest you figure out a similar way to validate the game files. This method works with crashing problems not only for Hogwarts Legacy but also for many other games.
5. Clean boot
The clean boot state means no third-party services will be active. When you boot into this mode, you will easily understand if any third-party service is affecting the game or not. To do it, follow these steps:
- Press Win + R on the keyboard to open Run.
- Type the following command and press Enter:
msconfig - Next, go to the Services tab.
- Check Hide all Microsoft Services and click on Disable all.

- Click on OK.
- At last, restart your PC.
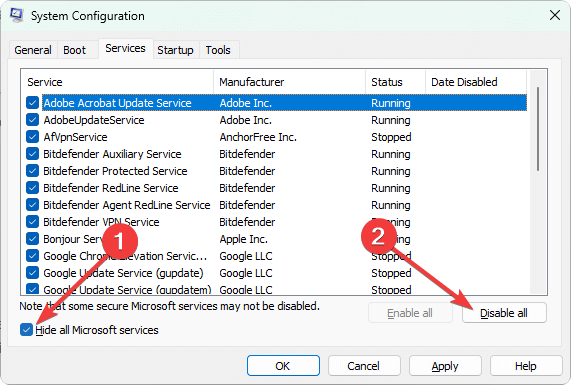
Now, if you managed to get rid of the Hogwarts Legacy crashes on startup, it means a third-party service is responsible. You can enable the services one by one to find out which one it is. Then, keep it disabled or uninstall the related software.
6. Disable ray-tracing
Ray-tracing software can be finicky and could be the reason of Hogwarts Legacy crashing problems if the hardware is not appropriately set up and optimized for it, particularly with a specific game. You can disable it easily by following the the steps:
- Use the following keyboard shortcut: Windows + R.
- In the pop-up window, type this: %localappdata%, then press OK.
- Navigate to the following path: Hogwarts Legacy/Config/WindowsNoEditor.
- Now, use Notepad to access GameUserSettings.
- Make sure all of the RayTracing options are turned into False:
- bEnableRaytracingShadows=False
- bEnableRaytracingReflections=False
- bEnableRaytracingAO=False
Turning off ray tracing could be a useful and speedy solution to resolve the problem of Hogwarts Legacy crashing on a PC.
Keep in mind that disabling ray tracing might also work if Hogwarts Legacy is out of video memory. If you ever experience this issue, make sure to check our dedicated fixing guide.
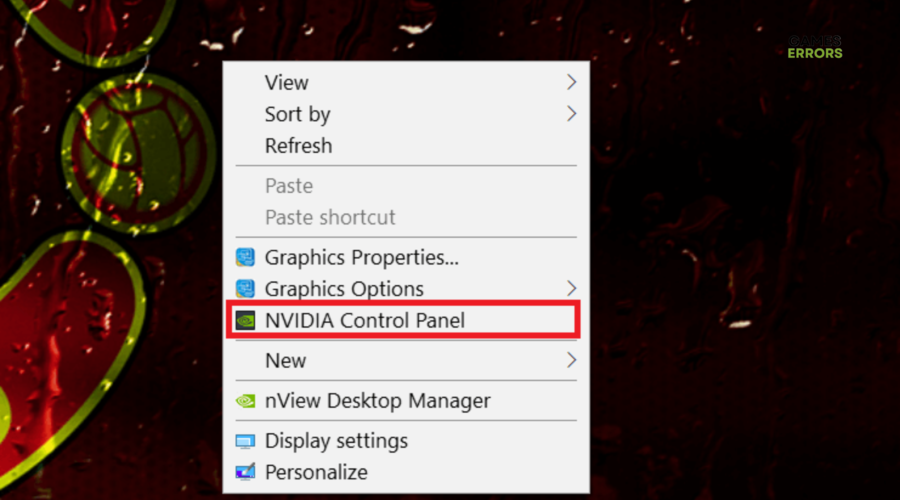
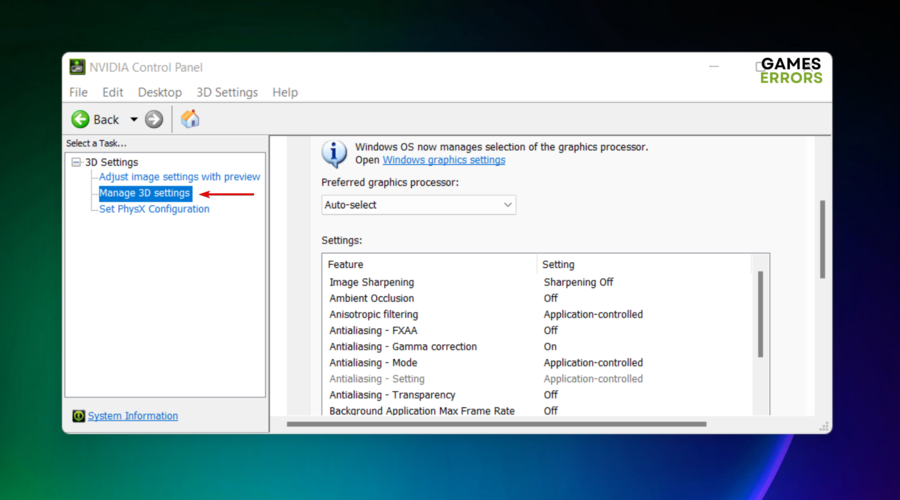
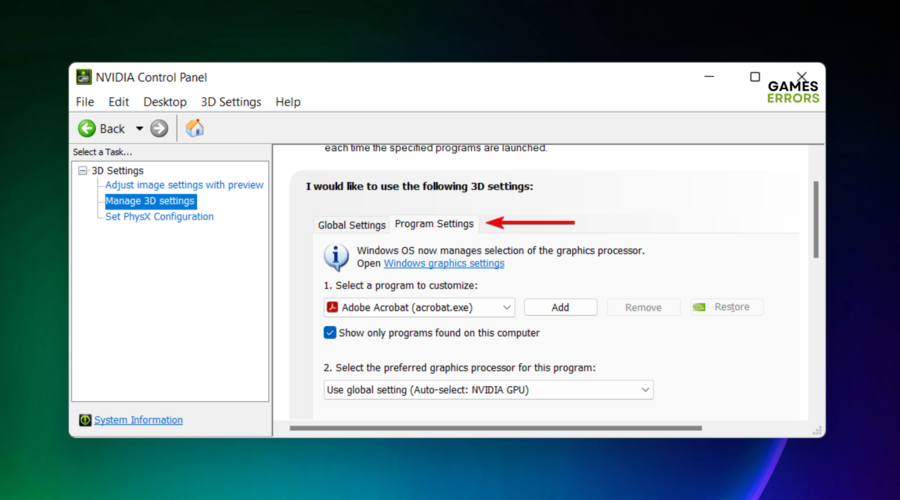
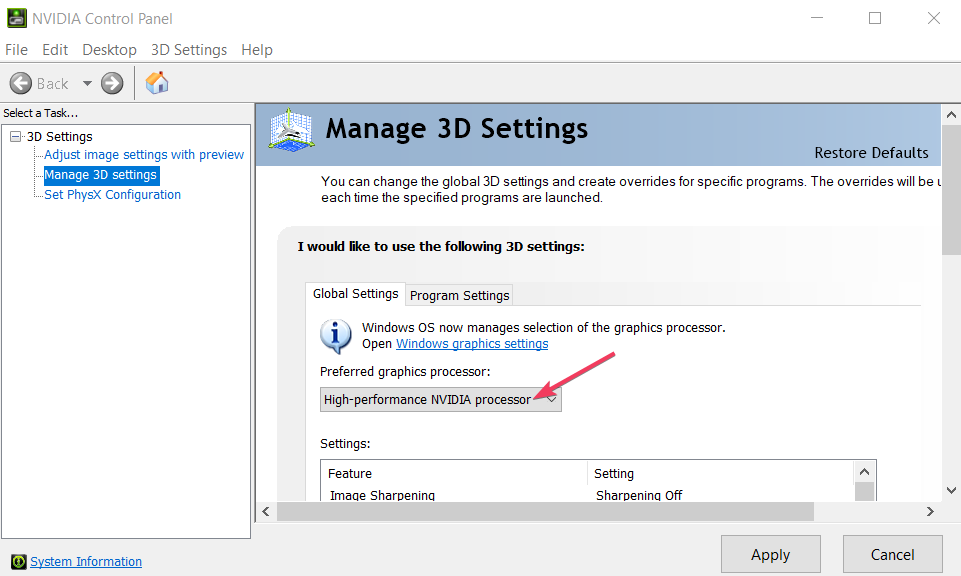
7. Disable over-clocking on your GPU
Overclocking can be both beneficial and harmful. If your CPU or GPU are older, they might not hold as the newer components, and you might end up having decreased FPS, a higher temperature on your GPU and a high usage rate, which might lead to a Hogwarts Legacy crash on startup problem, or other issues.
↠ NVIDIA
- Right-click on your desktop, then select Nvidia Control Panel (In some cases, you might first need to click on Show more options).

- Select Manage 3D settings.
- Navigate to the Program Settings.
- Under Select a program to customize, choose Hogwarts Legacy from the drop-down menu.
- Now, under Select the preferred graphics processor for this program, choose the High performance NVIDIA processor option.

- After this, click on Apply to save the changes, then exit.
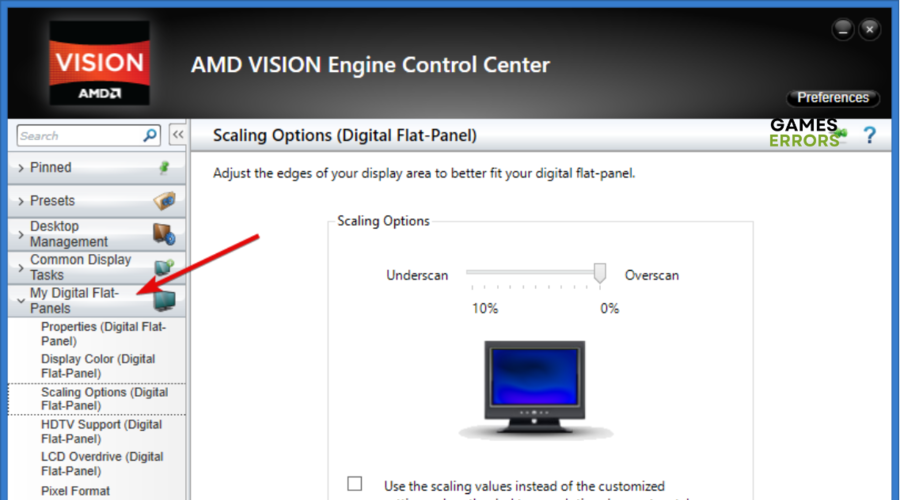
↠ AMD
- Open the AMD Catalyst Control Utility.
- Go to My Digital Flat-Panels.
- Now, select the Default option, next to the Pixel Clock Frequency.
- Save the changes, then exit.
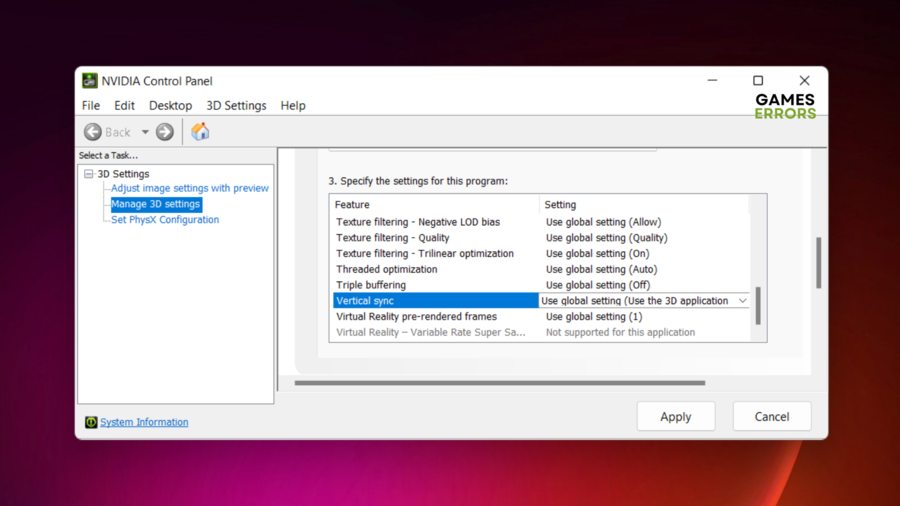
8. Enable/disable V-sync
I like playing games with the VSync on. It was a bit troublesome when I started using it because some games were moving slower, but thanks to it, I stopped having stuttering issues and random freezes. Additionally, it can fix the Hogwarts Legacy crash problems. However, it might also cause them based on your system specifications because it limits your GPU to match the refresh rate of your monitor.
⇒ NVIDIA
- Right-click on your desktop, then select Nvidia Control Panel (In some cases, you might first need to click on Show more options).
- Select Manage 3D settings.
- Now, in the shown list, search for V-sync (Vertical sync), then turn it On/Off.

- Click on the Apply button to save the changes, then exit.
⇒ AMD
- Open AMD Radeon Software.
- Navigate to the Gaming tab.
- Now, go to Wait for Virtual Refresh, then change its value.
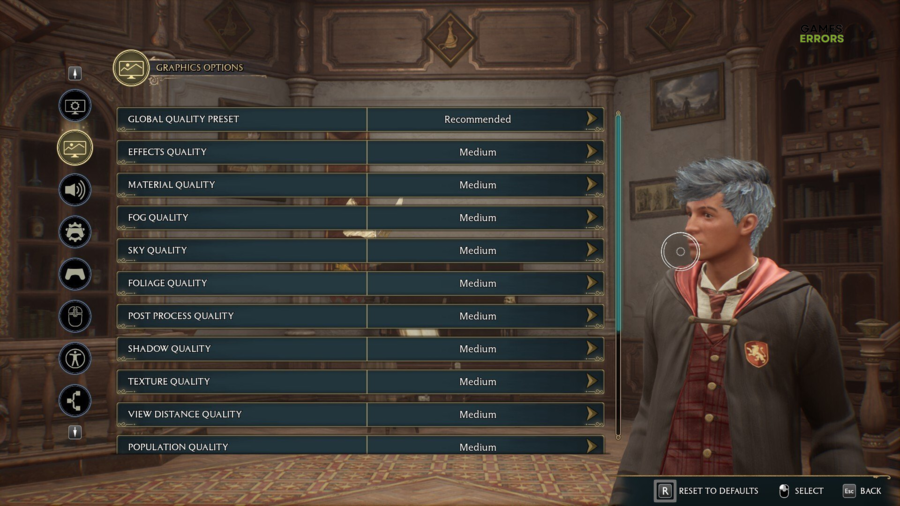
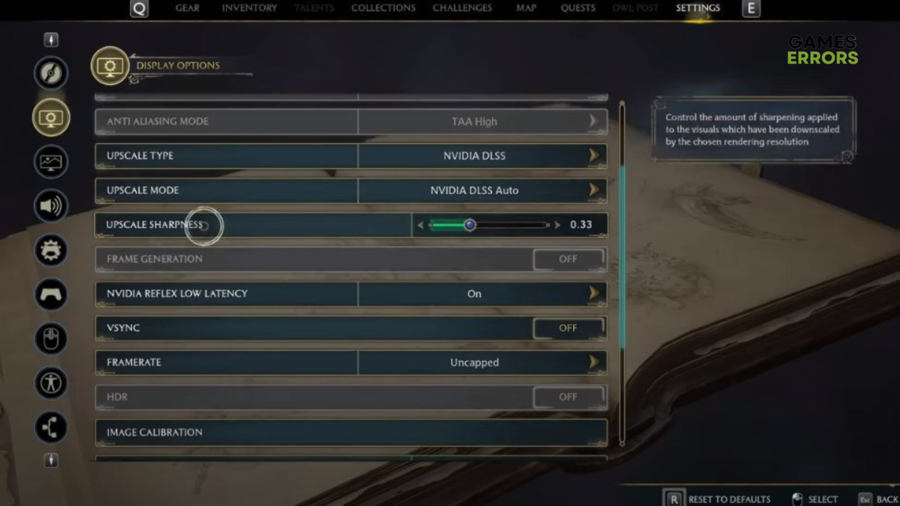
9. Lower in-game graphics
If you prefer playing games with the highest graphics available, expect FPS drops and Hogwarts Legacy crashes. The problem is that the game is not yet well-optimized. This results in a variety of other problems. I prefer playing it on medium graphics, and it still looks decent. However, I recommend turning off the Shadow Quality.
- Open Hogwarts Legacy, then navigate to Settings.
- Go to the Graphics Options tab.
- Make sure all the graphics settings are configured on low/medium.
- Now, navigate to the Display Options tab.
- Make sure that the Reflex Low Latency option is turned On.
- Ensure the following options are turned Off: Motion Blur; Depth of Field; Chromatic Aberration; Film Grain.
- Also, you need to make sure that Windowed Mode is set on Fullscreen.
- Now, choose to Apply Settings, then exit.
10. Download de Latest Version of DirectX
DirectX is an essential component for running games and is often included in game installation files.
However, if your PC is using an outdated version of DirectX, it may cause crashing issues when playing Hogwarts Legacy on Windows.
Unfortunately, DirectX cannot be installed separately since it’s already a part of Windows. Therefore, to avoid these problems, it’s important to make sure your operating system is up-to-date with the latest version.
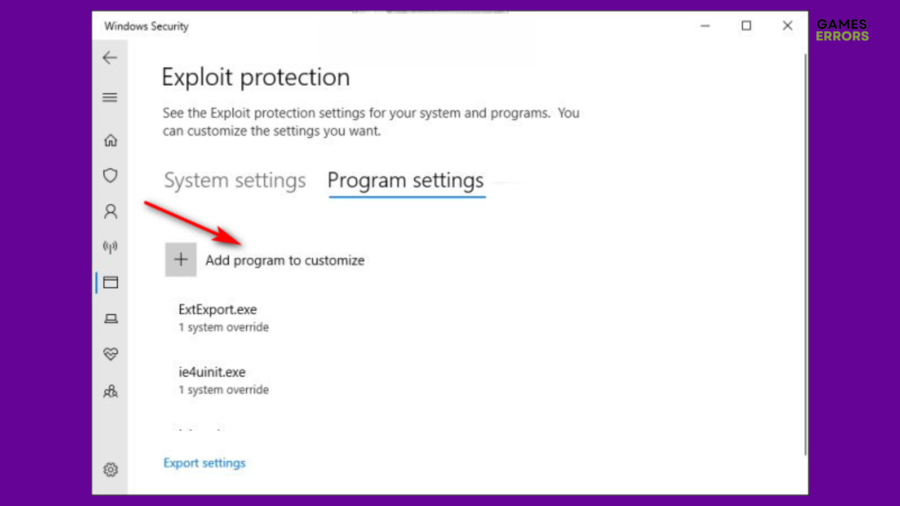
11. Disable Control Flow Guard (CFG)
This security feature might cause more harm than good when it comes to Hogwarts Legacy. It is mostly here to combat memory corruption and other problems. Yet, it can affect your performance. The best thing you can do is to disable it for a while.
- Hit the Windows key, then type Exploit protection in the search box, and open it.
- Navigate to the Program settings tab.
- Now, choose to Add a program to customize.
- Click on the Choose exact file path option.
- Browse and select the main executable of Hogwarts Legacy.
- After the game is added, select it, then click on Edit.
- Scroll down to Control flow guard (CFG), then checkmark Override system settings.
- Make sure you turn it Off.
- Save the changes, then exit.
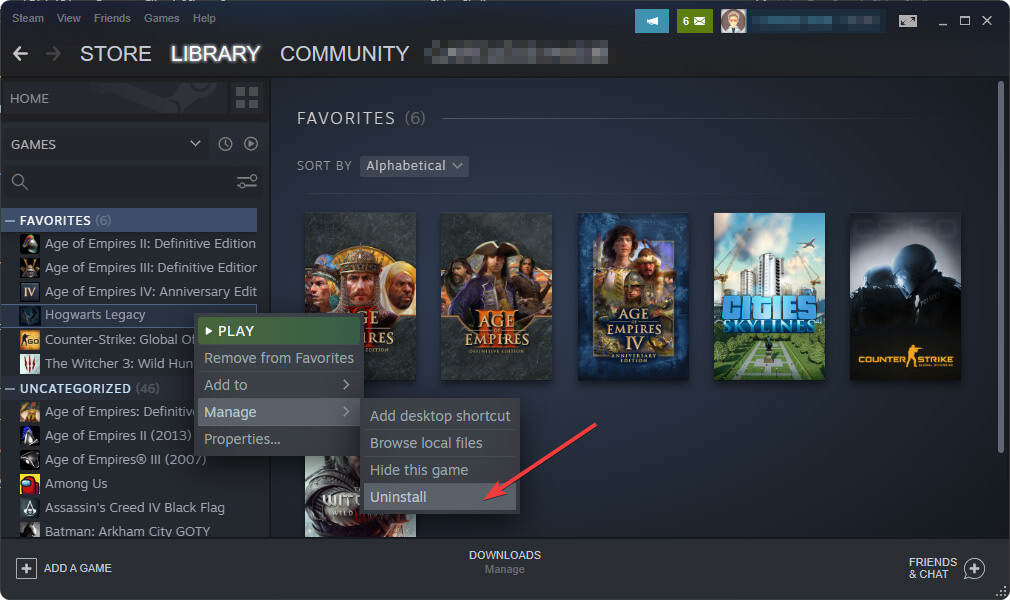
12. Re-install the game
As a last resort or a first option for some, reinstalling the game is a way to fix Hogwarts Legacy Crash problems. However, it takes time, and sometimes it might not work if the problem comes from another source. It worked for me a couple of times, but I rarely used this method.
- Open Steam or any other game launchers from where you have installed the game.
- Right-click on Hogwarts Legacy and hover your mouse on Manage and then click on Uninstall.

- After that, you should see the install button. Click on that button to install the game again.
13. Change the Graphics Settings accordingly
Sometimes the oldest trick in the book is the best one, by changing your graphics settings you will be able to minimize the resource usage of the game, thus you might stop Hogwarts Legacy from crashing and also boost your game performance.
- The first thing you can do is to switch from Full Screen to Windowed Mode.
- Play with Medium or Low Graphics.
- Enable or Disable VSync because this option syncs the frame rate with the refresh rate of your monitor, making the game run at 30 or 60 fps constantly.
- Cap or uncap your Framerate.
- Disable effects such as Motion Blur, Depth of Field and Chromatic Aberration.
- Set the Upscale Mode to Balanced.
- Enable Frame Generation.
If no other methods work, re-installing the game should work. It may take some time to do, but it is extremely useful.
You may still encounter the crashing issue. In this case, it may be because of your PC specifications or a hardware-related problem. It may be also a known bug. In this case, keep patience until the developer releases a patch.
🎁 Bonus solutions to fix Hogwarts Legacy crashing on PC:
If none of the above options worked for you, and you are still wondering why does Hogwarts Legacy keeps crashing, here’s what you can do as a bonus solution:
- Set the paging file size to system’s default.
- Set the in-game settings to low and custom graphics settings set to low/disabled. Cap your game at 30 or 60 FPS
- Run the game in compatibility mode
- Rollback your GPU driver
- Allow the game through the firewall or disable it
Related articles:
- How To Make Hogwarts Legacy Run Better On PC
- Hogwarts Legacy Won’t Launch
- Hogwarts Legacy Stuck on Loading Screen
- Hogwarts Legacy Low FPS
- Hogwarts Legacy Black Screen
- Hogwarts Legacy Screen Flickering Issue
Final Thoughts
This article has described how you can fix the Hogwarts Legacy crash problem. If you have any suggestions or opinions on this or have a better method that may help others, feel free to write them in the comment box below.

Improve this guide
User forum
0 messages